- Introduction
- Logging into the e-way Bill portal
- E-way Bill generation on the e-way Bill Portal
- E-way Bill Generation FAQs
Introduction
An e-Way bill, or Electronic Way Bill, is an online document required under India's GST system whenever goods worth over ₹50,000 are moved from one place to another. Whether it's an interstate journey or specific intrastate routes, having this bill is a must. It includes essential info like who's sending the goods (the consignor), who's receiving them (the consignee), a brief description of the goods, details about the transporter, and even the vehicle number.
It helps ensure taxes are properly accounted for and makes it easier to monitor goods while they're on the move. This bill has to be generated before the goods start their journey. That responsibility could fall on the supplier, the buyer, or the transporter, whoever kicks off the shipment.
What is an e-Way bill?
An e-Way bill is an online permit you create on the GST portal before transporting goods worth more than ₹50,000. To make one, you'll have to enter crucial details, such as the invoice number, the value of the goods, who's shipping them, and the vehicle number.
By tracking the movement of products in real time, authorities can monitor consignments and ensure that GST has been paid. Since the bill cross-checks invoices and transport information, it closes the loop around black practices such as spurious invoices or stealthy untaxed deliveries. It's simply about opening the process and leaving a clear audit trail.
Key features of an e-Way bill
The e-Way bill consists of the following elements:
EBN (e-Way Bill Number)
Each e-Way bill generated receives a 12-digit unique number known as the EBN (E-Way Bill Number). Imagine it as the digital tracking identification of the consignment. After the e-way bill is entered on the GST portal, the EBN gets automatically allocated and communicated to the supplier, the recipient, and the transporter. It's crucial for authenticating and validating the transportation of goods; anyone verifying the consignment, such as a GST officer, will use this number to retrieve all the relevant information.
Part A of the e-Way bill
This part records all the key information regarding the shipped goods. It contains:
- GSTIN (Goods and Services Tax Identification Number) of the supplier and recipient
- Invoice or challan number related to the shipment
- Value of consignment, which is used for ascertaining tax liability
- HSN code (Harmonized System of Nomenclature), which classifies the goods
- Delivery location, with pin code
- Purpose of this movement (such as sales, returns, job work, etc.)
Part A informs the system of what is being transported and between whom.
Part B of the e-Way bill
Whereas Part A is concerned with the goods, Part B is concerned with how those goods move from point A to point B. It contains:
- Vehicle number if the goods are moved by road
- Transport document number if the goods are transported by rail, air, or sea
- Mode of transport, i.e., whether by road, rail, air, or water
Without a correctly completed Part B, the e-Way bill is not valid for movement—it's like a ticket without a seat number.
The validity period of the e-Way bill
The e-Way bill is not open-ended. It has an expiration date, depending on the distance the goods have to travel. Here's how it generally works:
- For 100 km or less, the bill is valid for 1 day
- For each additional 100 km, one additional day is added
If your consignment is going 350 km, the e-Way bill is valid for four days. If goods are delayed beyond this, the bill must be updated or regenerated. This validity period ensures goods don't linger in transit suspiciously long without accountability.
Rules for e-Way bill generation
Under the GST framework, the e-Way bill is normally generated either by the suppliers or by the recipients (in case the goods are sold by a party without a GST number). However, if none of them have generated the e-Way bill, the transporters moving the goods from one place to another need to do so.
This applies to businesses with an annual turnover of ₹10 crores or more. The time validity based on the distance of goods transportation is restricted to 100 km daily.
Logging into the E-way Bill portal
In order to login to the portal for generation of the e-way bill, the following are the steps:
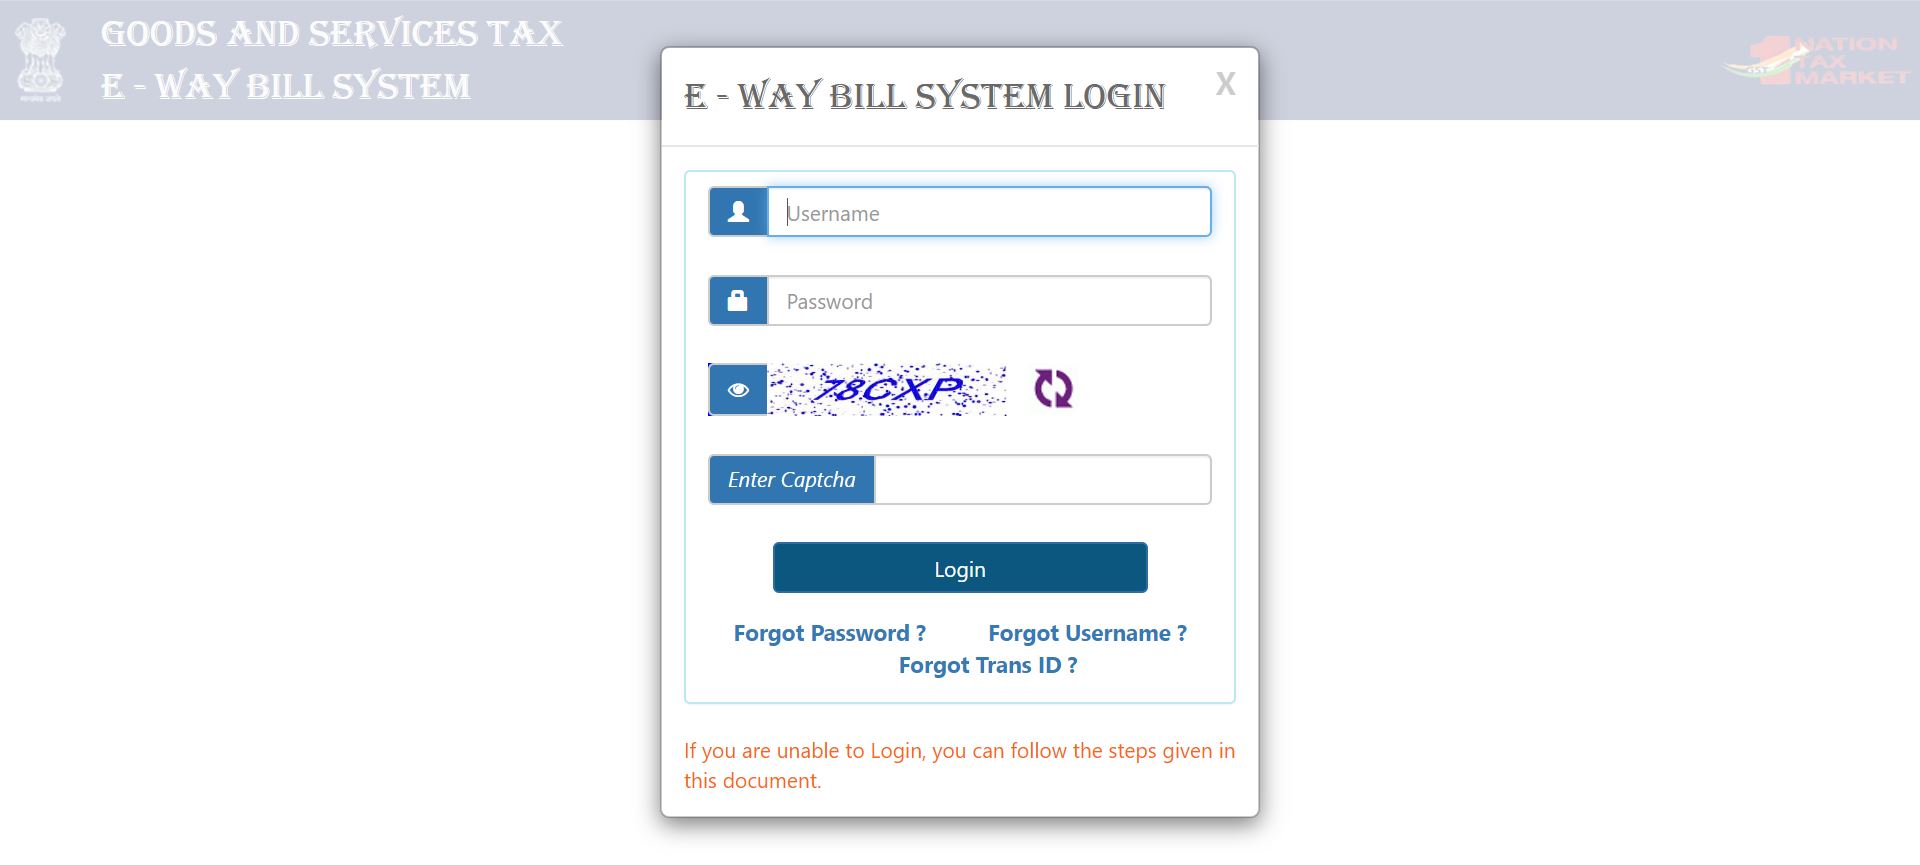
- Log on to ewaybill.nic.in
- Enter User Name and Password, then the Captcha Code, and then click "Login"
- On successful authentication of the credentials, the main menu of the e-way bill portal will open up, with various options for e-way bill generation and management
- On the left hand side of the main menu of the e-way bill portal, the following options are available:
- E-Waybill – this has sub-options to generate e-way bill as well as updating, cancelling and printing e-way bill
- Consolidated EWB - this has sub-options for consolidating e-way bills, updating and cancelling them
- Reject – this has the option to reject e-way bills which are generated by others if it does not belong to the supplier or transporter
- Reports – this has sub-options for generating various kinds of reports
- Masters -this has sub-options for creating masters, such as customers, suppliers, products, transporters etc.
- User Management –this has sub-options to manage sub-users, i.e. to create, modify and freeze sub-users
- Registration – this has sub-options which allow registering for SMS, Android App and API facilities in order to generate e-way bill
- On the right hand side of the main menu, there will be a notification panel which will show important e-way bill notifications and alerts from time to time. There is also a link to the GST portal, which one can use to directly navigate there if need be
E-way Bill generation on the E-way Bill Portal
The following are the steps to generate the e-way bill:
- Before the generation of e-way bill, be ready with the invoice/bill/challan details, and also the Transporter ID and vehicle number of the transporter, through whom the consignment is going to be moved
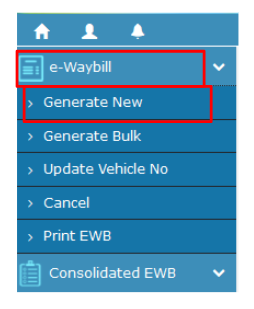
- On the main menu of the e-way bill portal, click the option "E-way Bill", and within that click the sub-option "Generate New"
- On doing so, the form for e-way bill filing will open up, containing numerous fields. While most of the fields are non-compulsory, certain mandatory fields will be marked – either with a red dot or with a green dot. The fields marked with a red dot will be mandatory for e-way bill, whereas the fields marked with a green dot will be mandatory for Form GSTR-1. All mandatory fields are marked with a *
- The form for e-way bill filing can broadly be divided into 3 parts:
- Transaction Details
- Item Details
- Transporter Details
- Transaction Details - This part will contain the following fields:
- Transaction Type* (Outward OR Inward)
- Transaction Sub-Type* (Options will show up based on the Transaction Type selected)
- Document Type* (Select from the drop-down menu. Options are “Invoice”, “Bill” or “Challan”)
- Document No.*
- Document Date*

- From –For an outward type of transaction, all the fields here will be auto-populated with the business details. If there are additional places of business, the user will be allowed to select the places as well. However, please note, that in spite of an auto-update, one will be allowed to edit one’s address. For an inward type of transaction, all the fields here will need to be filled by the user. However, if one has already created a master for the supplier, then one will be able to select the supplier by name, as soon as one feeds in the first 2 to 3 characters in the “Name” field. Post selection, all the other fields will be auto-populated, although one will still be allowed to edit details. In all, this section will have the following fields:
- Name
- Address
- GSTIN*(If a supplier is unregistered under GST, then write "URP")
- Place
- Pincode*

- To –For an outward type of transaction, fill all the fields here with the details of the recipient. However, if one has already created a master for the recipient, then one will be able to select the recipient by name, as soon as one feeds in the first 2 to 3 characters in the “Name” field. Post selection, all the other fields will be auto-populated, although one will still be allowed to edit details. For an inward type of transaction, all the fields here will be auto populated with the business details. If there are additional places of business, one will be allowed to select the places as well. However, please note, that in spite of an auto-update, one will be allowed to edit one’s address. In all, this section will have the following fields:
- Name
- Shipping Address
- GSTIN*(If the recipient is unregistered under GST, then write "URP")
- Place
- Pincode*
- Item Details - This part will contain the following fields:
- Product Name(If the master for the product is created, then one will be able to select the Product by name, as soon as one feeds in the first 2 to 3 characters. Post selection, all the other fields under this section will be auto-populated from the master)
- Description
- HSN*
- Quantity
- Unit
- Value / Taxable Value (Rs.)*
- Tax Rate (C + S + I + Cess)* (where C - CGST, S- SGST, I- IGST)
- Total Amount / Taxable Amount*(Sum of CGST Amount*, SGST Amount*, IGST Amount* & CESS Amount*. This will be calculated by the portal based on “Value / Taxable Value” and “Tax Rate” entered. However, one will be allowed to edit this amount also.)

- Transporter Details - - This part will contain the following fields:
- Mode* (Road, Rail, Air OR Ship)
- Approximate Distance (in KM)*
- Transporter Name (If the master for the transporter is created, then one will be able to select the transporter by name, as soon as one feeds in the first 2 to 3 characters. Post selection, all the other fields under this section will be auto-populated from the master)
- Transporter ID*
- Transporter Doc. No. & Date*
- Vehicle No.* (To be filled only, if the goods are being moved directly by the business. In this case, one may enter this field directly, without entering "Transporter Name", "Transporter ID" and "Transporter Doc. No. & Date")

- Click "Submit"
Once, the form is filled, the e-way bill generation will be completed and the e-way bill will be forwarded to the concerned transporter login account, allowing the transporter to enter "Vehicle No", while the goods are getting moved. At the same time, the e-way bill portal will validate the values entered, and in case of any error, it will pop up an appropriate error message. If all is in order, the e-way bill generation will happen in Form EWB-01, which will carry the unique 12 digit e-way bill number.
Using TallyPrime
Tally simplifies the e-Way bill generation process and helps you create a sales invoice with the required details. The result is a JSON file that can be uploaded to the portal (waybill.nic.in).
This helps to control errors and the time needed for the process.
Validity and amendments
Understanding the validity and provisions for amendments in e-Way bills is crucial for ensuring compliance and smooth goods transportation. Below are the key points related to extension, cancellation, and permissible changes.
- Extension can be requested under exceptional circumstances.
- The process for cancelling or amending an e-Way bill (if required) is 24 hours.
- Amendments (if any) can only be made to part B.
Common compliance errors and how to avoid them
Businesses commonly make the following mistakes when generating e-Way bills: generating incorrect GSTINS, wrong vehicle numbers, incomplete or missing invoices, and entering inaccurate distances.
Tips to ensure compliance -
- Double-check the data before uploading.
- Reply on TallyPrime for faster results.
- Update the master data.
Penalties for non-compliance
There are fines and consequences for failing to generate or carry an e-Way bill like -
- Penalties will be ₹10,000 or more.
- Seizure of goods.
- Penalties for transporters.
Benefits of e-Way bill compliance
There are several benefits of e-Way bill compliance through TallyPrime, like -
- Improved efficiency in goods tracking and timely deliveries.
- Transparency in the supply chain and reduced tax evasion penalties.
- Avoid penalties and ensure legal safety in case of disputes.
- Streamlined audits, etc.
E-way Bill Generation FAQs
What information do I need to generate the e-way bill?
The key documents required for the generation of the e-way bill are tax invoice or bill of supply or delivery challan and transporters ID with the transporter document number. The vehicle number in which the goods are transported must also be available to generate e-way bill.
What is the validity period of e-way bill?
The validity of the e-way bill depends on the distance of the goods being transported. One day validity has been provided for transportation of goods up to 200 KMs in regular vehicles. The validity of the e-way bill expires at midnight on the last day.
Why is an e-Way bill required?
The e-Way bill plays a vital role in ensuring tax compliance and helps prevent tax evasion during the movement of goods.
Who is required to generate an e-Way bill?
The supplier must generate the e-Way bill. If the recipient is GST registered but the supplier is not, then the duty is with the latter to ensure compliance.
If the suppliers have not generated the e-Way bill, the onus falls on the transporter to create one.
What are the exemptions from e-Way bill requirements?
Here are common exemptions from e-Way bill requirements -
- Exception of value,
- Exemption based on conveyance,
- Exemption based on transportation route, etc.
Can I cancel an e-Way bill after it is generated?
A generated e-Way bill can be cancelled within 24 hours (provided the goods have not been transported).
Know More about E-Way Bill
E-Way Bill, E-Way Bill Rules, E-Way Bill Verification, GST Exemption list for E-Way Bill, E-Way Bill State Wise, How to Register E-Way Bill, How to Generate Bulk E-Way Bill, How to Cancel E-Way Bill, Minimum Distance required for E-Way Bill
GST
GST Software, GST Calculator, GST Exempted Goods & Services, GST Rates, HSN Codes, SAC Codes, GST State Codes, New GST Returns & Forms, Sahaj GST Returns, Sugam GST Returns


