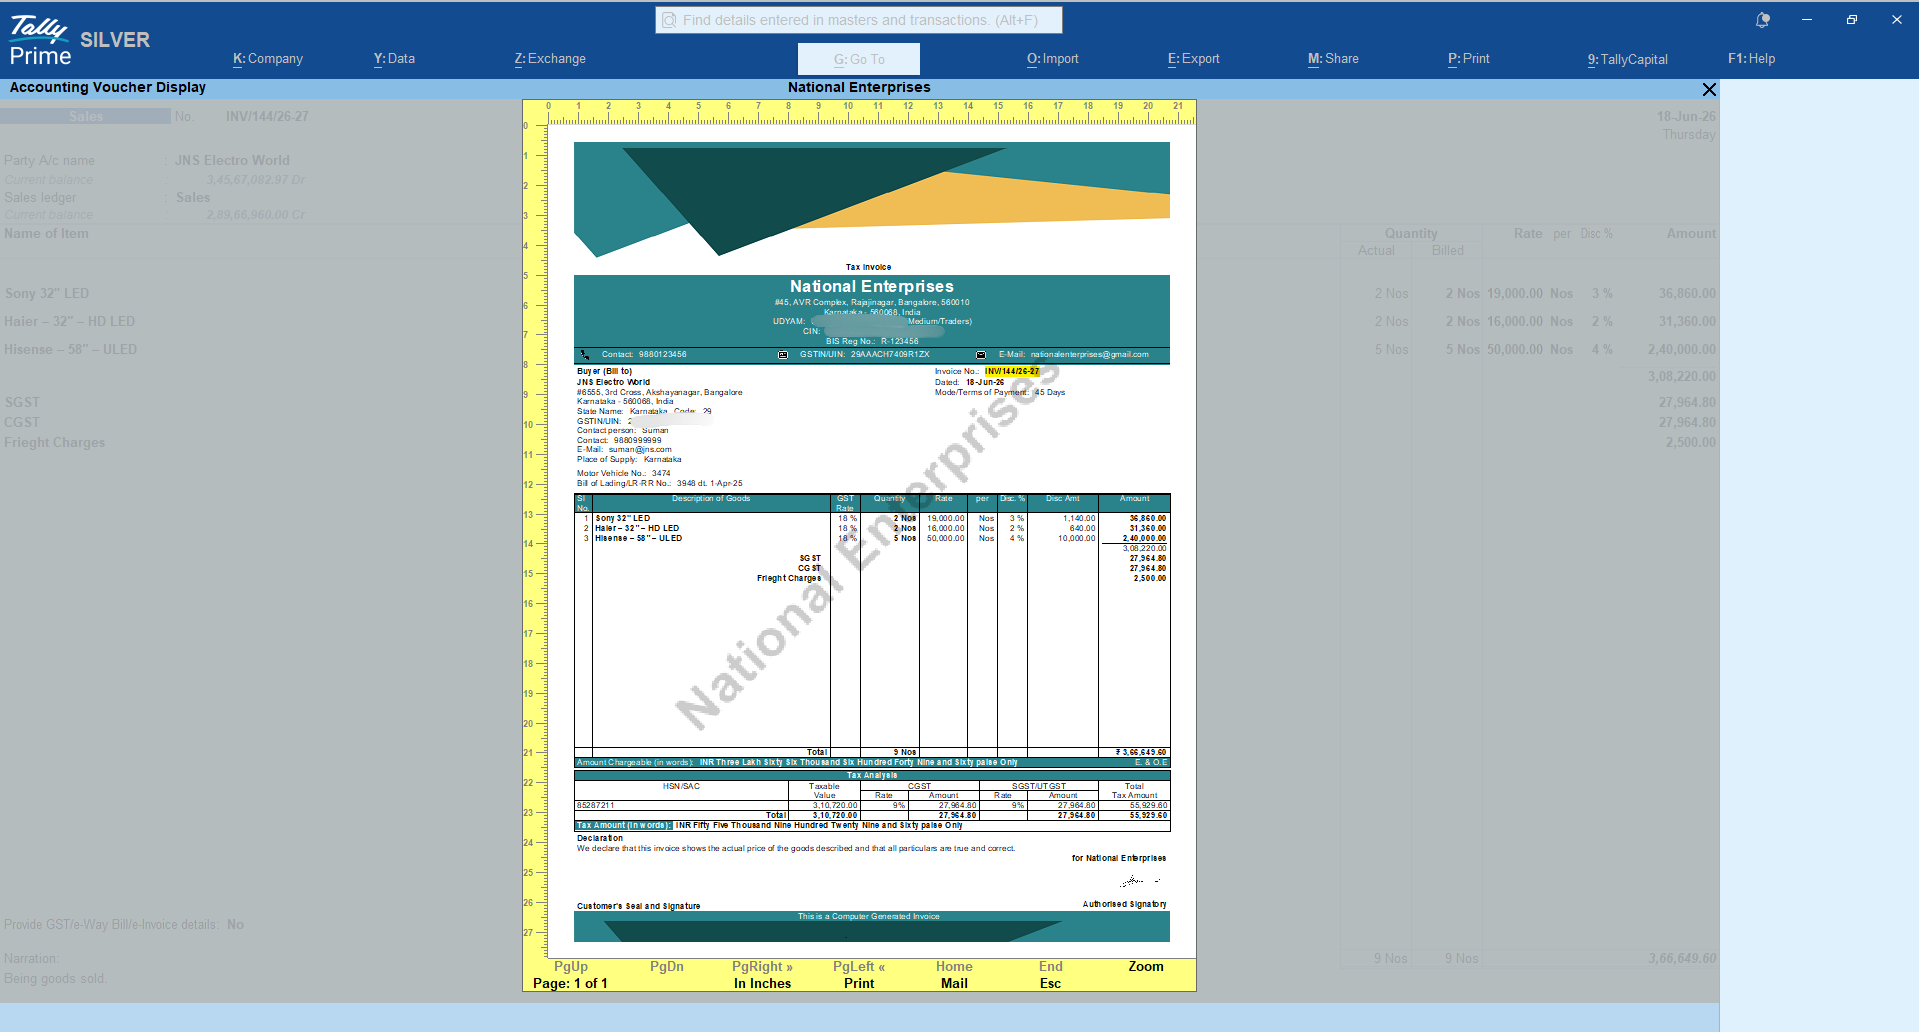
Creating a professional invoice in TallyPrime involves two steps: recording the sale through a sales voucher and customising the invoice layout using built-in print configuration settings. This allows businesses to add multiple logo, watermarks, signatures, display GST details, adjust columns and format invoices to meet both compliance requirements and customer expectations all within TallyPrime.
Under the Goods and Services (GST) regime, a tax invoice must contain prescribed details such as the supplier's GSTIN, invoice number, date, taxable value and tax amounts. TallyPrime automatically captures these requirements when the company, stock items and ledgers are configured correctly, while also giving users control over how the invoice appears when printed or shared. Both transaction entry and invoice customisation are managed entirely within TallyPrime.
How to create a sales invoice in TallyPrime?
Open TallyPrime and follow these steps to record a sales transaction as a tax invoice:
- Go to the Gateway of Tally and select Vouchers.
- Press F8 to open the Sales voucher screen, or select Sales from the list.
- Set the voucher date using the Date field at the top right.
- In the Party A/c Name field, select or create the customer ledger. TallyPrime will pull the customer's GSTIN and address if they are already set up.
- Select the appropriate Sales ledger. The GST rate configured on this ledger determines how tax is calculated.
- Add line items in the inventory section. For each item, select the stock item and enter the quantity and rate. TallyPrime calculates the amount automatically.
- Review the GST section below the items. It displays the applicable CGST, SGST or IGST based on the place of supply.
- Enter the voucher number in the Ref field if you use your own numbering series.
- Press Ctrl+A or Enter to save the voucher.
Once the voucher is saved, all invoice details are available for printing or further customisation through TallyPrime's print configuration settings.
How to customise invoices in TallyPrime?
TallyPrime has introduced template-based invoice personalisation — a faster, more visual way to personalise invoices for Print, Export, and Share. The business software features multiple ready-to-use templates, each with a different layout for your company details, party section, item table, and footer, so you can pick a starting point close to what you need and personalise from there.
To get started, open any sales invoice, press Ctrl+P (Current), then Ctrl+H (Change Template) to browse and select a template.
Adding or removing fields
Once you're in the Invoice Template screen, press F4 (Add/Remove Field) to control what shows up — bank details, contact information, multiple addresses, and more — based on what your business needs printed.
Branding with watermark and logo
Press F5 (Watermark) to add a text or image watermark. This is useful for marking invoices as "Paid," "Duplicate," or "Confidential." Press F6 (Header Image) to add your company logo or a header image above or below the invoice title. You can also add a footer image.
Fonts and colours
Use F8 (Font & Colour) to match your invoice to your brand's font style and colour scheme, and F9 (Edit Field Properties) to fine-tune size, alignment, and colour for individual fields.
Saving and setting defaults
Once you're happy with a layout, press Ctrl+L (Save Template) to save it, and Ctrl+A to confirm. You can set a template as default per voucher type — so, for instance, your North Sales and South Sales vouchers can each print with their own look — and apply it at the company level or across all companies.
You can learn more about each invoice personalisation option here: Personalise and Customise Invoices using TallyPrime: A Guide to Invoice Personalisation
What goes into a professional invoice under GST?
A professional GST invoice contains all mandatory details prescribed under Section 31 of the Central Goods and Services Tax (CGST) Act, 2017, along with clear transaction information that allows the buyer to claim Input Tax Credit (ITC) and helps the supplier maintain compliance.
The Central Board of Indirect Taxes and Customs (CBIC) requires a tax invoice to include:
- Supplier’s legal name, address and GST Identification Number (GSTIN)
- A consecutive serial number containing only alphabets, numerals or special characters
- Date of issue
- Recipient’s name, address and GSTIN (for registered recipients)
- Harmonised System of Nomenclature (HSN) code or Service Accounting Code (SAC)
- Description, quantity and unit of goods or services
- Total taxable value after adjusting for any discount
- Rate and amount of Central GST (CGST), State GST (SGST) or Integrated GST (IGST) separately
- Place of supply and, where it differs from the billing address, the delivery address
- Whether tax is payable on a reverse charge basis
- Signature or digital signature of the supplier
TallyPrime populates most of these fields from your company master and ledger configurations. The transaction-specific details that typically require manual entry are the invoice date, line items, quantities and values.
Watch this video on How to Generate an e-Invoice for Sales in TallyPrime Under Section 7 of IGST Act
Conclusion
Getting an invoice right in TallyPrime is mostly about setup: the company master, ledger configurations and stock item details. Once those are correct, the voucher entry itself is quick and the print configuration handles the layout. The mistakes that create compliance problems almost always trace back to a ledger setting or a missing HSN code rather than anything in the transaction itself.
TallyPrime includes all the tools needed to produce a GST-compliant, professionally formatted invoice and to configure its appearance on paper, without any external help. For business owners who want to handle this end-to-end on their own, the configuration screens are accessible and the logic is consistent once the base setup is done.