- Moving data to new financial year
- Splitting company data
- Create new books and import the data
- Upgrading to the latest release
It’s that time of the year again, the business owners, alongside their financial team, hustle and bustle around to get their books and financial statements right. Yes, you rightly guessed! The new financial year is about to begin.
The extra push for businesses and their teams during the last few weeks of the financial year is nothing new. It’s the same every year. If you are a business using TallyPrime, you can end the financial year with little drama as possible and be ready to welcome the new financial year.
With this in mind, we have put together different ways to be ready for the next financial year using TallyPrime.
Moving data to new financial year
You may do all that is possible to close your books on the last day of the financial year, but in reality, you will have spillover or certain activities can only be carried out after the closure of the financial year.
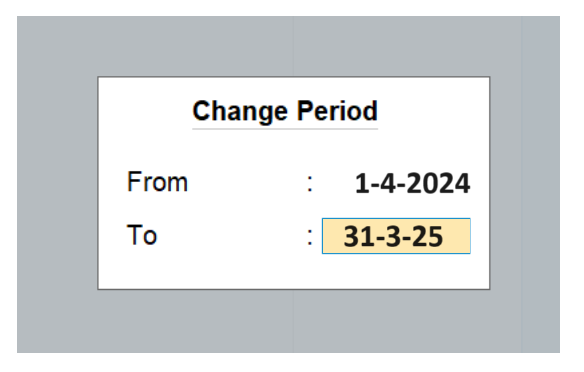
While you got all the time to do that, what’s important here is to move into the new financial year and start the books from the 1st day of the new financial year. With Tally, moving into the new financial year is as simple as changing the date.
| Personalise the Business Reports the Way You Want | Best E-Invoicing Software Solution for Businesses in India |
To change the current period, Go to Gateway of Tally > click F2: Period and enter the dates.
This way, you can:
- Continue to record vouchers in the same company data
- Maintain zero downtime, helping you start the new year on a hassle-free note
Splitting company data
If you choose to separate your previous financial year into a different company, split company data will be helpful. Ideally, it is performed when the closure activities, such as analysis, audits, all adjustments, etc., in books of the previous financial year, are completed.
To ensure the split activity is smooth, you need to perform the data verification process before splitting. This automatically detects possible errors in the data.
- Click on 'Data' available in the top menu> Split > Verify Data
- Select the company you want to split
- If there are any errors, the list will be shown for you to correct it
To split the company data, again click on 'Data' available in the top menu >Split > Split Data >Select Company. Once you’ve selected the company, enter the date in the Split From field (Ideally, the new financial year date) and press Enter.
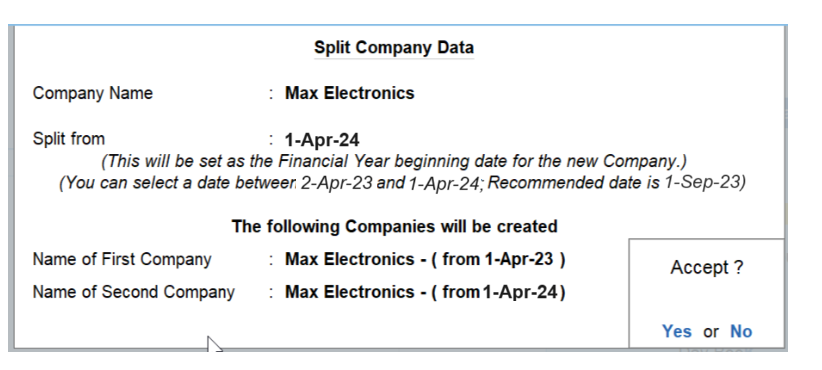
When you split the data, the original data is retained, and two new companies with unique names and dates are created. You can rename the split company as required and save the original data in another location.
Split company data help you:
- Secure old data and start work in a different company
- Maintain a separate company for each financial year
- Carry forward all ledger balances automatically
- Accurately split your transactions of the previous financial year from the current financial year
Create new books and import the data
If you wish to create a new company, export the closing balances of the ledgers and stock items of the previous company, and import them as opening balances in the new company. This helps you to clean your data by removing redundant masters such as inactive ledgers, obsolete stock items etc.
- To create a new company:
- Click 'Company'option available in the top menu or Press Alt+K for 'Company'.
- Select 'Create' and mention the company details
- Enter 1-4-2023 as the Financial year begins from
To know the detailed steps to create the company, read 'How to create a company in TallyPrime?
- To export closing balances from Previous F.Y company:
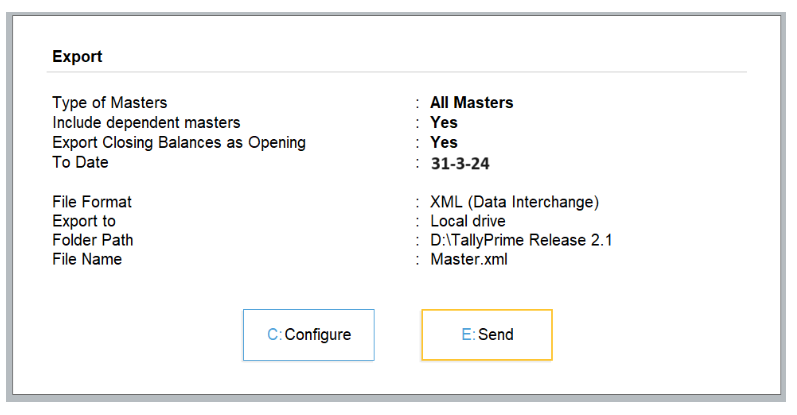
- Click 'E: Export' option available in the top menu or press Alt + E
- Select 'Masters'
- Click on 'Configure'
- Press enter to enable ‘Export closing balance as opening’
- Mention the closing balance date and press ESC to go back
- Press enter on 'Send' to export the details in the XML file
- To import closing balances as opening balances in the new company
-
- Click 'O: Import' option available in the top menu or press Alt + O
- Select Master
- Mention or select XML file location ( E.g. C:\TallyPrime\Master.xml)
- Select ‘Modify with New Data’ in treatment of entries already existing
- Press enter to import

-
On completing the import process, you can compare the masters of both importing and exporting company from the statistics report. To view statistics, press Alt + G for Go To > Type and select statistics report from the list. If you wish to clean up the redundant or inactive ledgers or stock items, you can delete those.
Watch video on moving to the new financial year using TallyPrime
Upgrading to the latest release
At Tally, we come up with regular releases to make the product even more useful and provide an amazing experience for users. To make sure you’re not missing out on any important feature, it is important to always stay updated.
TallyPrime, our new business management simplifies the lives of business owners through simple to use business software, insightful reports, multi-tasking & much more. Yet to upgrade? Here is the link to download the latest release of TallyPrime
Already in TallyPrime but yet to upgrade to the latest release of TallyPrime? Here is how you can upgrade.
Click the 'F1:Help' option available in top menu >Upgrade>Select the latest release and press 'Enter' > Select 'U: Upgrade Now > Say 'Yes' to confirmation message > Again, say 'Yes' to restart the TallyPrime with administrator rights. Next, TallyPrime will restart in administrator mode to update the product.
Note: You need to have an active Tally Software Services (TSS) subscription to upgrade to the latest release.
New changes or policies expected to be implemented in the upcoming financial year
Here is the list of new changes or policies related to GST and other statutes expected to be implemented in the 2024-2025 financial year:
- e-invoicing is expected to be applicable for businesses with turnover exceeding 1 crore.
Know more on e-invoicing and audit trail