Goods and Services Tax (GST) is a unified indirect tax levied on the supply of goods and services across India. Under the GST law, every tax invoice must meet a defined set of requirements, which includes specific fields, correct tax types and accurate values.
Excel is a practical and accessible way to build a template that meets these standards without investing in dedicated software from day one. It works well because a one-time setup effort pays off across hundreds of invoices. The catch is that a minute error, like missing a field or a broken formula, can make an otherwise clean invoice non-compliant.
What must a GST-compliant invoice include?
Before even opening your Excel file, make sure that all of the mandatory data that is required to be on the invoice is known to you. A tax invoice must contain the following information:
- Details of supplier and recipient: It includes name, address and Goods and Services Tax Identification Number (GSTIN).
- Invoice number and date: Invoice number is to be assigned serially for each financial year.
- Place of supply: It helps to decide whether the transaction would attract Central GST (CGST) + State GST (SGST) or Integrated GST (IGST).
- HSN/SAC code: The Harmonised System of Nomenclature (HSN) code is used for goods, while the Services Accounting Code (SAC) is needed for services. These codes are mandatory above certain turnover limits.
- Taxable value and tax amount: Value of the taxable services/goods classified as per the GST rate. It is essential that they be provided separately for CGST, SGST and GST as per the applicable case.
- Total invoice value: The payable amount, both in figures and words.
- Signature/digital signature: Either a manual signature of the authoriser or their digital signature.
Omitting any one of these fields renders the invoice technically deficient. Without them, the recipient cannot claim input tax credit, which can strain business relationships.
How to build the template in Excel: Step-by-step
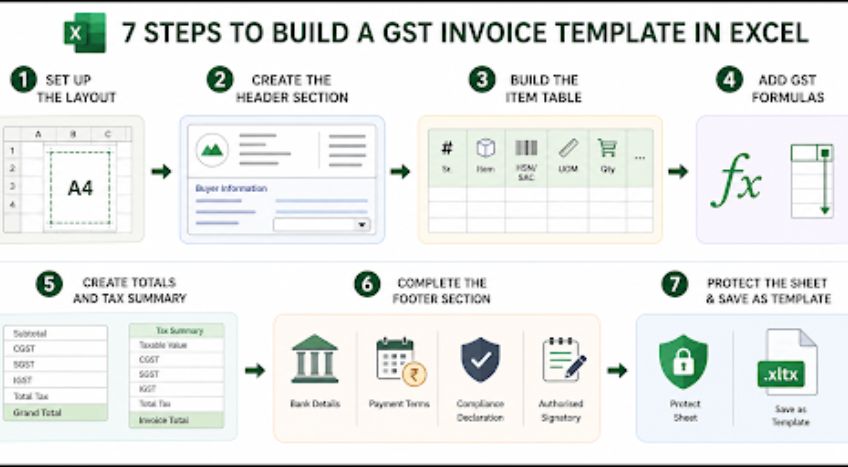
Building the template is easy when approached in order. Here is how to do it correctly:
Step 1: Set up the layout
Before entering content, go to ‘Page Layout’ and then ‘Print Area’ to set the page within A4 dimensions. This prevents invoice sections from being cut off while printing or converting to PDF. Keep row heights slightly larger for better readability.
Step 2: Create the header section
The header contains business and transaction details required under the GST law. Divide it into two sections. The left side should consist of:
- Business name
- Business address
- GSTIN
- Contact details
- Company logo
The right side should consist of:
- Invoice number
- Invoice date
- Due date
- Place of supply
Insert the logo using ‘Insert’ and then ‘Pictures’. Below this, create the buyer information section with the following fields:
- Buyer name
- Buyer address (mandatory for B2C invoices above ₹50,000)
- Buyer GSTIN (mandatory for B2B invoices)
- Place of supply
The ‘Place of Supply’ field determines whether CGST and SGST or IGST will apply. Create a dropdown using ‘Data’, then ‘Data Validation’ and then ‘List’. Add two options: Intrastate and Interstate.
Step 3: Build the item table
Below the header, create the line-item table in this sequence:
- Column A: Serial Number
- Column B: Item Description
- Column C: HSN/SAC Code
- Column D: Unit of Measurement
- Column E: Quantity
- Column F: Rate per Unit
- Column G: Discount
- Column H: Taxable Value
- Column I: GST Rate
- Column J: CGST
- Column K: SGST
- Column L: IGST
- Column M: Total Amount
The HSN or SAC code should follow the turnover-based requirements under the GST law. Leave around 10 to 15 rows for item entries.
For the GST Rate column, restrict values to valid GST slabs notified by CBIC: 0%, 5%, 12%, 18% and 28%. Use ‘Data’, then ‘Data Validation’ and then ‘List’ to create the dropdown. This reduces incorrect tax entries and keeps calculations accurate.
Step 4: Add GST formulas
This section handles all automatic tax calculations in the invoice. Assume the Place of Supply dropdown is in cell B5 and the first item row starts from row 8.
Under the GST law, intrastate sales attract CGST and SGST in equal parts, while interstate sales attract IGST at the full rate. The formulas below automate this calculation based on the place of supply selected in the dropdown.
Enter the formulas in the following sequence:
|
Cell |
Formula |
|
H8 |
=E8*F8-G8 |
|
J8 |
=IF($B$5=“Intrastate”,ROUND(H8*I8/200,2),0) |
|
K8 |
=IF($B$5=“Intrastate”,ROUND(H8*I8/200,2),0) |
|
L8 |
=IF($B$5=“Interstate”,ROUND(H8*I8/100,2),0) |
|
M8 |
=H8+J8+K8+L8 |
After entering these formulas once, drag them down for all remaining item rows. This ensures every row calculates automatically without manual entry.
For GST-inclusive pricing, where the entered amount already includes GST, the taxable value and GST portion need to be separated using formulas.
Use the following formula to calculate the original taxable value before GST:
- =Inclusive Price/(1+GST Rate/100)
Once the taxable value is calculated, use the following formula to calculate the GST amount included in the final price:
- =Inclusive Price-Original Price
Step 5: Create totals and tax summary
After the last item row, create a totals section to summarise the complete invoice value. If your item rows run from row 8 to row 22, use the following formulas:
|
Row label |
Formula |
|
Subtotal (Taxable Value) |
=SUM(H8:H22) |
|
Total CGST |
=SUM(J8:J22) |
|
Total SGST |
=SUM(K8:K22) |
|
Total IGST |
=SUM(L8:L22) |
|
Total Tax |
=SUM(J8:J22)+SUM(K8:K22)+SUM(L8:L22) |
|
Grand Total |
=SUM(M8:M22) |
The Subtotal row adds all taxable values before GST. The CGST, SGST and IGST rows calculate the total tax collected under each category. The Total Tax row combines all GST components, while the Grand Total row shows the final invoice amount payable by the buyer.
Next, create a separate tax summary box beside or below the totals section. This section makes invoice review easier for both buyers and sellers during GST filing and reconciliation. Include the following fields in the summary:
- Taxable value
- CGST
- SGST
- IGST
- Total tax
- Invoice total
Step 6: Complete the footer section
The footer should contain payment and compliance-related details. Add a bank details section with the account holder name, bank name, account number, IFSC code and UPI ID.
Next, mention the payment due date and any payment terms, if applicable. Under GST rules, also include the declaration: ‘Whether tax is payable on reverse charge basis: Yes / No’.
You can additionally add delivery terms, warranty notes or return conditions if required.
At the bottom-right corner, create the authorised signatory section with the signature field, name and designation. A scanned signature image can be inserted using ‘Insert’ and then ‘Pictures’.
Step 7: Protect the sheet and save it as a template
Once the invoice structure and formulas are complete, protect the sheet to prevent accidental editing of formulas and fixed fields.
Select all formula cells and fixed business information cells. Right-click and choose ‘Format Cells’, then go to ‘Protection’ and tick ‘Locked’. After this, open ‘Review’ and then ‘Protect Sheet’ to apply password protection.
Keep only editable fields unlocked, including:
- Buyer details
- Invoice number and date
- Place of supply
- Item description
- HSN/SAC code
- Quantity
- Rate
- Discount
- GST rate
This ensures users can only edit transaction-related details while keeping calculations protected. Finally, go to ‘File’ and click on ‘Save As’. Select the file type as Excel Template (.xltx) and save the file.
Saving the invoice as a template allows Excel to automatically create a fresh, editable copy every time the file is opened, without changing the original format. Save each completed invoice separately using the invoice number for easier tracking, audit support and future reference.
When Excel is no longer enough
For a freelancer or a small business sending a few invoices a month, a well-built Excel template is sufficient. But volume changes everything. With hundreds of invoices a month, manual data entry becomes the bottleneck.
Further, Excel is not connected to the GST Network (GSTN). Every invoice needs to be manually entered into GSTR-1, which doubles the work and increases the chances of a mismatch. Businesses with a turnover above ₹5 crore are required to generate e-invoices through the Invoice Registration Portal (IRP), something Excel cannot do.
Conclusion
A GST invoice template in Excel works well for businesses managing a limited number of invoices. With the right formulas, dropdowns and protected cells, it helps maintain accurate GST billing and basic compliance.
As invoice volume grows, manual entry and GST filing become harder to manage efficiently. This is where TallyPrime helps by automating GST calculations, e-invoicing, return-ready reports and invoice management in one place. Start your free trial and simplify billing as your business grows.