Schedule III financial statements are financial reports prepared in accordance with Schedule III of the Companies Act, 2013. This puts down the format for presenting a company's Balance Sheet, Statement of Profit & Loss, and Notes to Accounts. For companies following the Companies (Accounting Standards) Rules, 2006 (AS), Schedule III Division I standardises financial reporting and makes it easier for regulatory compliance.
Schedule III Division I is applicable to companies preparing financial statements under Accounting Standards (AS) instead of Indian Accounting Standards (Ind AS). It is commonly used by MSMEs, closely held companies, CA firms, finance teams, and accountants responsible for statutory financial reporting. Using the right tools to prepare these statements helps reduce manual effort while making statements in the right format.
Introducing financial statements Schedule III for corporates with TallyPrime
TallyPrime is introducing an Add-on that will help generate financial statements for Corporate Entities (Schedule III for Division I) in accordance with Schedule III of the Companies Act and the latest ICAI guidelines. Using a smart Excel-based template, the TallyPrime Schedule III for Division I Add-on simplifies financial statement preparation, ensures accuracy, and reduces effort.
You can export data required for preparing financial statements from TallyPrime to Excel, where data is automatically populated in the required formats. Close to 80 - 90% of details are auto mapped from TallyPrime making the process effortless. Also, there is built in data validation for incomplete or missing information.
All you would need to do is review the default mapping, enter the required details in the input sheets, and provide necessary disclosures to generate compliance-ready financial statements.
How to generate Schedule III financial statements in TallyPrime
Step 1: Export financial data from TallyPrime
Open the Balance Sheet report in TallyPrime. Press Alt + E (Export), select Financial Statements, and choose Schedule III for Division I from the available options.
Configure the export settings based on your reporting requirements. You can export current and previous year data, include stock details, debtors and creditors, configure bill-wise or party-wise information, choose whether to export zero-balance ledgers, and automatically open the Excel template after export. Once configured, click Export to generate the Excel workbook with financial statements and notes.
Step 2: Review the ‘Basic Information’
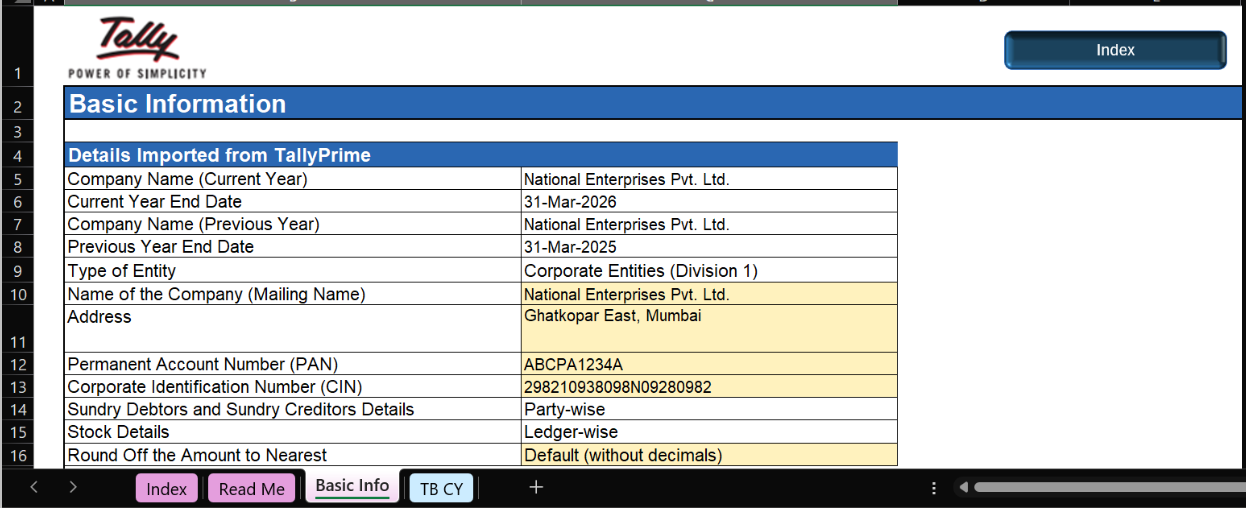
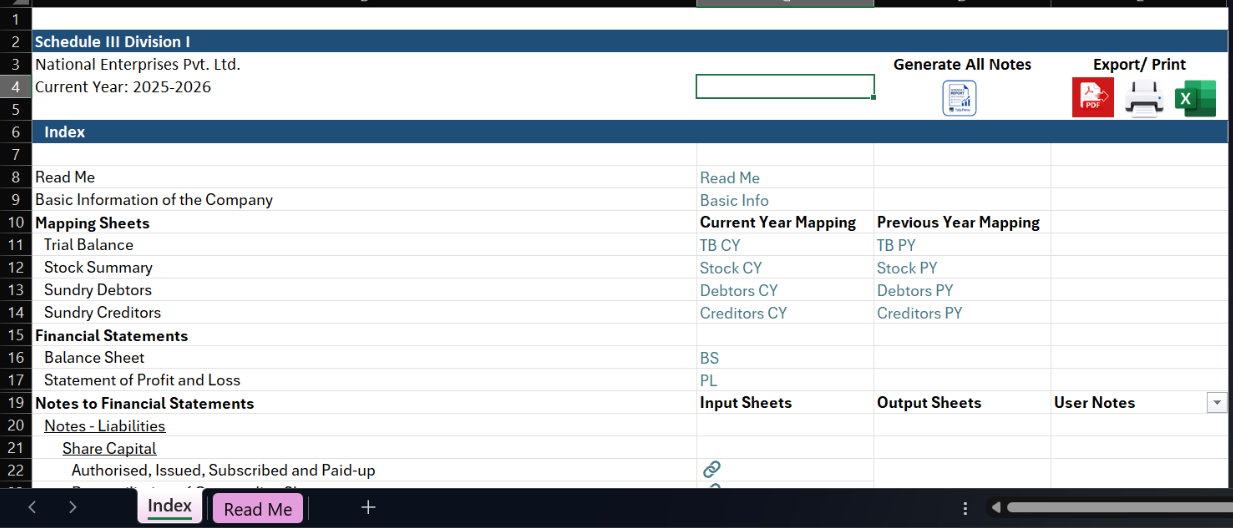
The exported workbook opens with all available data automatically populated into the relevant tabs. Use the Index tab to navigate to all statements and notes. Click on ‘Basic info’. Review the company details, reporting period, and other imported information on the Basic Info sheet, then complete any fields highlighted in yellow, including signatory information, reporting preferences, and share capital details.
Step 3: Furnish details in each statement and respsective notes
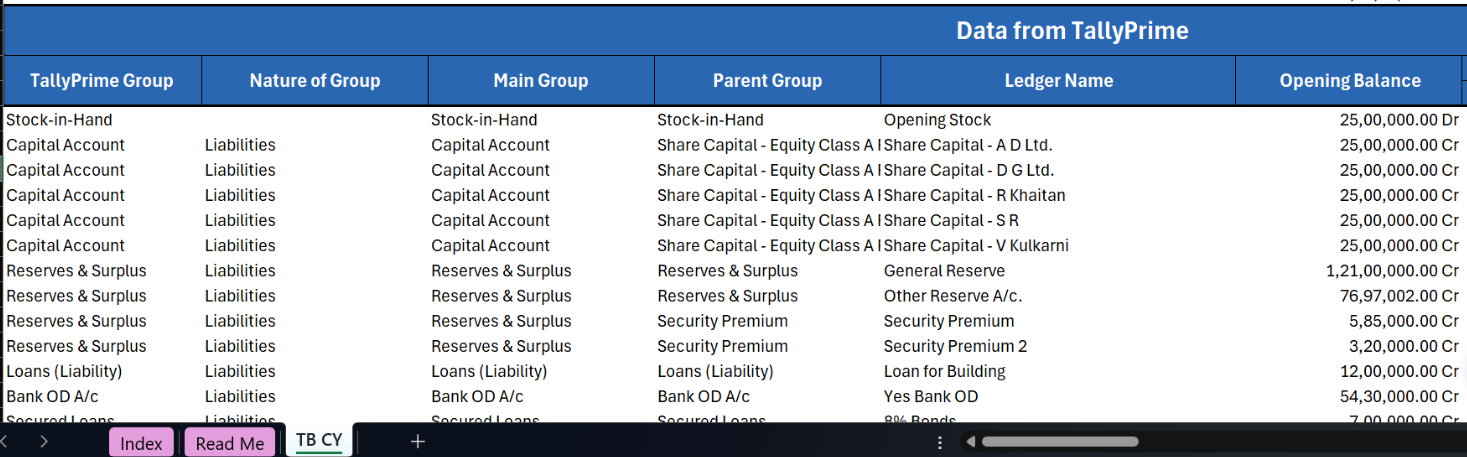
Navigate to the Trial Balance worksheet where the exported ledgers are organised for Schedule III classification. Most details are already mapped automatically based on Tally's default parent groups, reducing the amount of manual classification required.
You will be required to go to respective note tabs by clicking on input sheet option from the index tab to furnish details in notes which will be automatically captured in the trial balance.
Navigate to the ‘Mapped Status’ column to find the mapped status.
Review the pre-mapped values, classify any unmapped ledgers, and verify that the mapping accurately reflects your financial data. After completing the current year's mapping, use Update Mapping from TB Current Year to automatically copy the same mapping to the previous year's Trial Balance, making year-on-year reporting much faster.
Similarly, review the other statements and furnish the respective notes to complete filling in the details for all financial statements.
Step 4: Complete additional inputs and generate the financial statements
Where required, bifurcate balances into current and non-current portions, record provisional adjustments, and update the input sheets to reflect the latest mappings. Additional information specific to individual schedules can be entered in the corresponding input sheets before generating the final reports.
Once everything is complete, generate the notes and export the finished financial statements in PDF or Excel format for statutory reporting and future reference.
Generating notes to accounts and disclosures
Once the notes have been correctly filled in, TallyPrime uses the mapped information to populate the relevant input sheets and generate the corresponding notes automatically.
You can also capture additional disclosures wherever required by entering explanatory information in the designated input sheets. Only the sections containing values are included when generating the Notes to Accounts, ensuring that the Balance Sheet and Profit & Loss Account remain synchronized with the latest disclosures.
How TallyPrime simplifies financial statement preparation
Preparing Schedule III financial statements manually often involves exporting data, classifying ledgers, maintaining disclosures, preparing notes, and ensuring consistency across multiple reporting periods. TallyPrime streamlines this process by combining automated data export, intelligent ledger mapping, a guided Smart Excel template, and built-in reporting workflows into a single solution.
With most ledgers automatically classified, previous-year mappings reusable, and notes generated directly from mapped data, businesses can significantly reduce manual effort while improving reporting accuracy. Whether you're an MSME, chartered accountant, finance professional, or corporate accounting team, TallyPrime helps you prepare Schedule III-compliant financial statements more efficiently and with greater confidence.