Every time I use Linux, I wonder—how does it boot up and bring me to a shell? What background processes (daemons) are running? And more importantly, can I make it run my own program during startup? These questions sparked my curiosity to explore how the Linux boot process works.
Linux is well-known for its flexibility, openness, and ease of customization. One exciting thing you can do is build your own kernel and set up a minimal user space. In this guide, I will walk you through compiling the Linux kernel and replacing the default startup program (init) with a simple “Hello World” program. It’s a great way to get hands-on experience with how Linux boots and how you can tailor it to your needs.
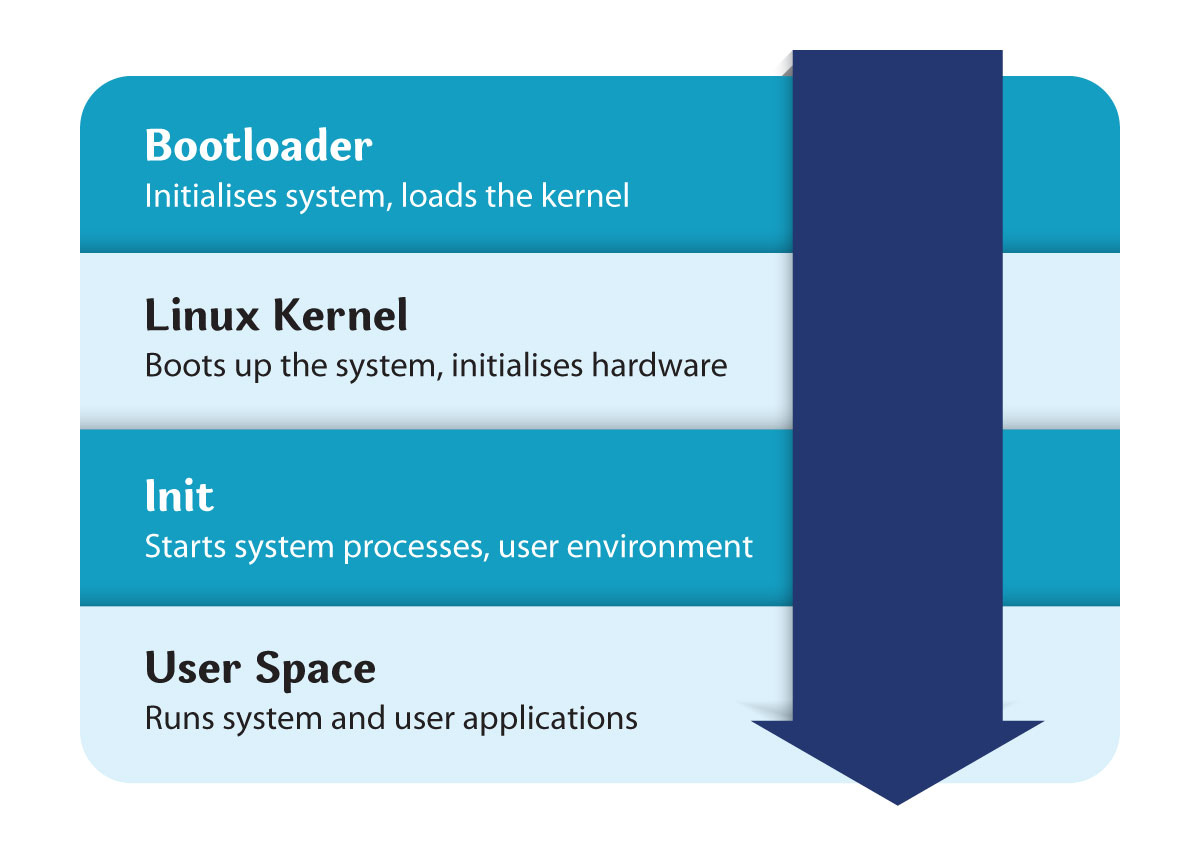
Understanding the Linux boot flow
Before diving into kernel compilation and system customization, it’s important to understand how Linux boots up. The boot process consists of several distinct phases that transition from hardware initialization to a functional user environment.
- Bootloader: The First Step
The system starts with the BIOS or UEFI firmware, which initializes the CPU, memory, and storage controllers. Then, it hands off control to the bootloader, which resides in the Master Boot Record (MBR) or EFI System Partition.
The most used bootloader on Linux systems is GRUB (GRand Unified Bootloader). It can load different kernel versions, pass boot parameters, and even offer a selection screen. In embedded systems or minimal Linux environments, lighter bootloaders like Syslinux or U-Boot are preferred.
GRUB reads the configuration file (usually `/boot/grub/grub.cfg`) to locate the kernel image (e.g., `vmlinuz`) and initrd (initial RAM disk). It then places the kernel in memory and jumps to its entry point, effectively transferring control from firmware to the Linux OS.
For systems with secure boot enabled, the bootloader must also be signed and verified, adding another layer of trust and security during the startup.
- Linux kernel
Once loaded, the kernel takes over it and initializes the CPU, memory, device drivers, and mounts the root file system. After finishing hardware setup, it executes the first user-space process: the init program.
- Init process
Traditionally, init is a binary like `/sbin/init`, `systemd`, or `busybox init`. It is the parent of all processes and is responsible for setting up the user space.
- User space
Finally, init launches all background services, user shells, and the graphical interface (if any), completing the system startup.
Now, let us start by building the Linux source code from scratch.
Linux boot flow diagram
Downloading the kernel source
We can download the Linux kernel source code from the official Linux kernel source code. We can visit the https://www.kernel.org or use the following command:
- tar -xf linux-6.8.tar.xz
- cd linux-6.8
Also, make sure that your system has required build tools:
- build-essential libncurses-dev flex bison libssl-dev libelf-dev
Configuring the kernel
Before compiling, the kernel must be configured. There are several options:
- make defconfig: Loads the default configuration.
- make menuconfig: Opens a TUI interface to customize features.
- make tinyconfig: Builds a minimal configuration.
For a basic experiment, defconfig is good enough:
make defconfig
Advanced kernel configuration
Kernel configuration is a critical step that allows you to define which features, drivers, and modules will be compiled into the final image. The Linux kernel contains thousands of options to support various CPUs, filesystems, device drivers, and system features.
Running make menuconfig opens a text-based interface where these options can be toggled. For instance, you can enable networking support, turn off sound systems, or configure specific CPU optimizations. This is especially helpful when targeting embedded systems or hyper-optimized custom builds.
Another key flag is CONFIG_INIT, which lets you specify the default init binary to run. If you're not patching the kernel directly, the default is /sbin/init, but this can be overridden using kernel parameters init.
You may also choose between monolithic and modular builds. In monolithic builds, all required drivers are built into the kernel, while in modular builds they are loaded later from the root filesystem.
Building the kernel
Now let us compile the kernel code. This might take some time depending on your CPU:
- make -j$(nproc)
Install the modules and kernel image:
- sudo make modules_install
- sudo make install
Once the build is successful, you will find the built kernel image in this path:
- arch/x86/boot/bzImage
Creating a custom Init program
Let us write a simple C program to replace the traditional init system. Here's a simple "Hello World" program.
// init.c
#include <stdio.h>
int main() {
printf("Hello from Init!\n");
while (1); // Keep the program running
return 0;
}
Compile it statically so that it doesn’t depend on shared libraries:
- gcc -static -o init init.c
Static vs dynamic linking for Init
Why is it important to statically compile the init program? The answer lies in reliability and simplicity. At early boot time, shared libraries such as libc.so are not yet accessible unless explicitly bundled into the root filesystem. If your init binary is dynamically linked and the required .so files are missing or in the wrong location, the system will panic or hang. Static linking ensures the binary contains everything it needs to execute. The downside is slightly larger binary size, but in embedded or controlled environments this tradeoff is acceptable. To check if a binary is statically linked, use the below command, If it says “not a dynamic executable,” you’re good to go.
- ldd init
Creating a root filesystem
You now need a minimal root filesystem that contains your init program.
- Create directory structure:
a. mkdir -p rootfs/{bin,sbin,etc,proc,sys,dev}
b. cp ./init rootfs/
- Package the root filesystem into an initrd:
a. cd rootfs
b. find . | cpio -o --format=newc > ../rootfs.cpio
c. cd ..
Expanding the root filesystem
Once your custom init is running, you can evolve your root filesystem into a more capable environment. A common next step is to add BusyBox, which provides a suite of Unix tools in a single binary—shell, ls, cat, mount, etc.
Networking can be introduced by enabling network-related kernel modules and adding ip, ifconfig, or dhclient utilities to the rootfs. To enable SSH or telnet, integrate Dropbear or TinySSH.
For persistent storage, mount a virtual disk (using -hda with QEMU), create an ext4 filesystem on it, and mount it from /etc/fstab or directly in init.
You can also experiment with different init systems like OpenRC, runit, or even container-based ones like systemd-nspawn.
Booting with QEMU
You can now boot your kernel and custom init program using QEMU:
- qemu-system-x86_64 \kernel arch/x86/boot/bzImage \initrd rootfs.cpio \append "console=ttyS0" \nographic
You should see output as:
Hello from Init!
And the kernel will remain running with the init process in an infinite loop.
When dealing with custom kernels and root filesystems, things don’t always go smoothly. Here are some common pitfalls and how to address them:
- Kernel panic - not syncing: No init found: This means your kernel couldn't find the init binary. Double-check that /init exists in your rootfs and is executable.
- "Unable to mount root fs": Indicates issues with rootfs format or initrd. Ensure the cpio archive is created properly and passed correctly to QEMU.
- Silent boot: Use console=ttyS0 in kernel parameters to get output over QEMU's serial interface.
You can also enable debug messages during boot by appending debug or loglevel=7 to the kernel command line.
In this article, we explored the end-to-end process of downloading and compiling the Linux kernel, creating a minimal root filesystem, and running a custom init program. By controlling both the kernel and user-space initialization, you gain a deep understanding of Linux internals, boot processes, and embedded system development.
This experience lays the groundwork for building custom Linux distributions, embedded devices, or unikernels.