An issue/query which has come via any media needs to be recorded in order to track and provide the most appropriate solution followed by closure.
To add an issue/query to the support centre follow the steps given.
• Click New
The list of sub-options for New appears as shown:
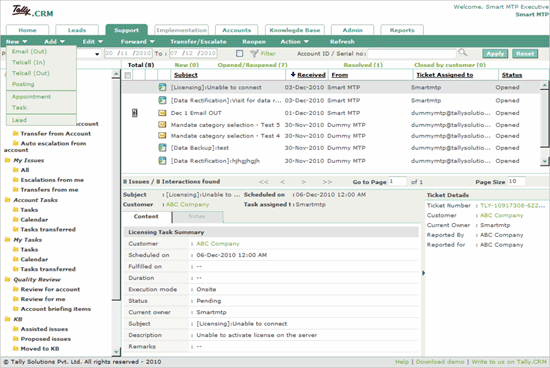
Select the required mode of interaction from the drop down:
Email (Out) – record outgoing Email interaction
Telcall (In) – record incoming interaction via phone call
Telcall (Out) - record outgoing interaction via phone call
Posting - record an issue/query in person, i.e, queries/issues recorded by a walk in customer. Issues recorded here are posted to the Tally.ERP 9 Support Centre..
Appointment – schedule an appointment
Task – record a task
Lead – record a business opportunity received by you as TSP/TI.
You can use this option to reply to an issue/query received from the customer by E-Mail, telephonic call or you had posted an issue/query through Telcall/Posting/Email. To reply to an existing issue/query follow the steps shown
• On selecting Email (out)
The New E-Mail screen appears as shown:
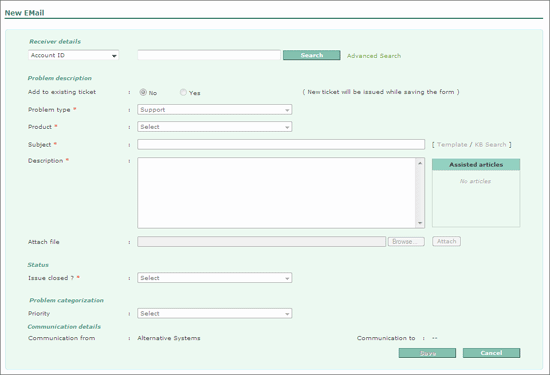
In Receiver details
Select Account ID/Serial Number/Ticket Number
Account ID: Select this and enter the customer’s account ID in the field provided.
Serial Number: Select this and enter the License Serial Number in the field provided.
Ticket Number: Select this and enter the earlier Ticket Number in the field provided.
Click Search
The Customer details appear displaying the Status and Account Name
In the Problem description section
To tag this issue to an existing Ticket Number check Yes and enter the ticket number in the Ticket Number field. Check No if the ticket number does not exist. A new ticket number is assigned on saving the form.
Based on the details provided earlier the Site, Product and Operational Account are prefilled.
Type the mail subject in the Subject field
Enter the solution to in the Description field
Click Browse, select the required file and click Attach to attach a file to the existing mail.
In the Status section
To close the issue select Yes or to keep the issue open.
Or
Select No you can escalate the issue to an Executive or to the next Stage
On selecting Transfer to Executive, select Support Executive or Support Manager and select the name of the Executive or Manger.
Or
Select Transfer to Stage and select the required Stage from the drop down list displayed.
In the Problem Categorisation section
Select the required category from the drop down list box and the sub categories based on the category selected.
Select the required Priority of the issue from the drop down list.
Select the appropriate date and time for the expected date of closure in Expected Closure (External)
Select the appropriate date and time for the expected date of closure in Expected Closure (Internal)
In the Communication Details section
The Communication From and Communication To fields are pre-filled with name of the company originating this mail and the name of the recipient company.
The From field is pre-filled with an appropriate support email address.
Enter the recipients email address in the To field.
Enter the required email address in the CC field.
Enter the required email address in the BCC field.
The completed New Email form appears as shown:
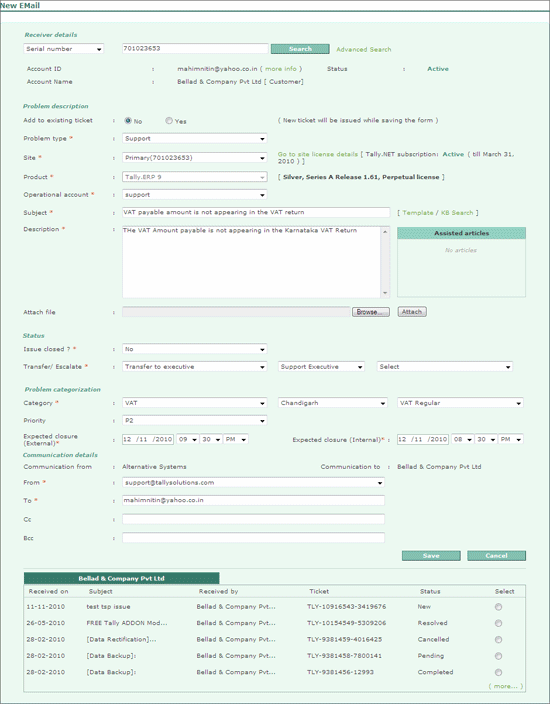
Click Save
All incoming telephonic calls need to be recorded in order to track them and provide adequate support to the respective customer. Calls recorded will also work as reference points to the customer as well as the support personnel in future when a similar issue arises from the same or a different customer.
To record incoming telephonic calls from the customer follow the steps shown:
In the Support tab
Click New
Select Telcall (in)
The Identify tab appears as shown:
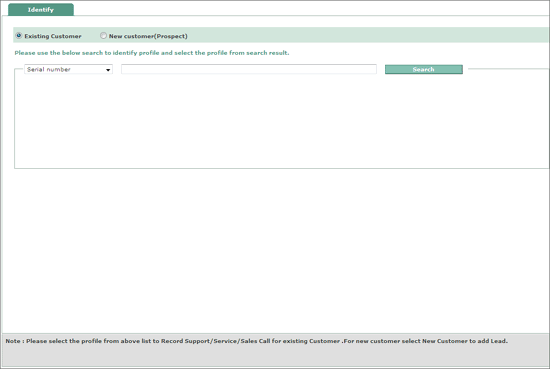
Information of an existing customer
Check Existing Customer
Select the required option Caller ID/Email ID/Account ID/Serial Number
Based on the option selected enter the appropriate information.
Note: The Caller ID is picked up automatically by the system at the customer support centre. TSP/TI’s need to enter the customer’s caller id manually.
Click Search
The customer details appear as shown:

Click Select
The Account Profile Management form appears as shown:
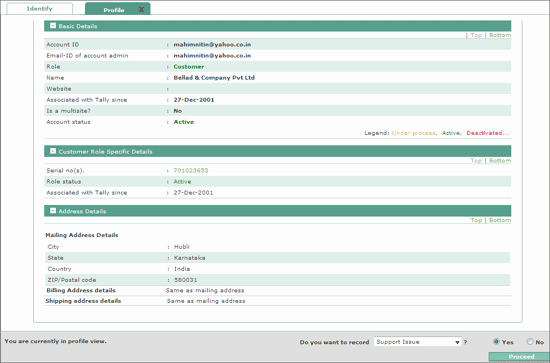
Select Support Issue from the Do you want to record drop down list
Click Proceed
The Submit inward telcall form appears as shown:
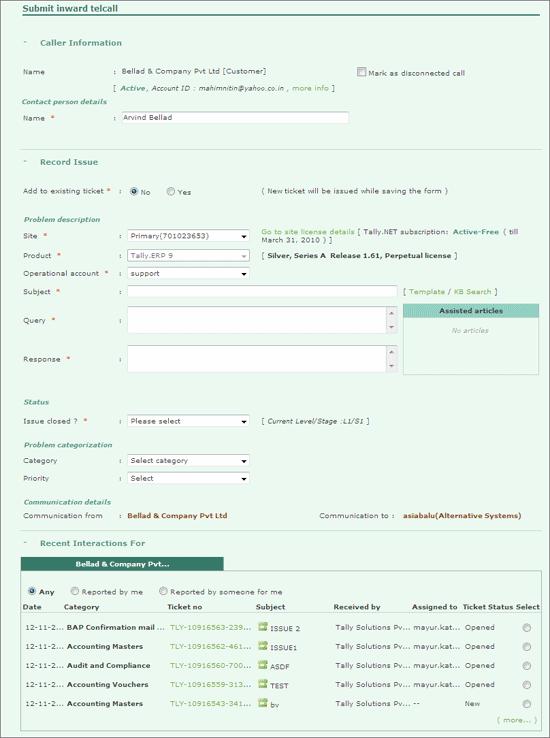
The Customer Details appear in the Caller Information section as shown.
Note: When an incoming call is disconnected check Mark as disconnected call and save the form
In Record Issue section
Set Add to existing ticket to No to allot a new ticket number for the issue being recorded or click Yes to link this issue to an existing ticket number.
In Problem Description section
The Site, Product and Operational Account details are prefilled, click Go to Site License Details to view the Site Information Page for the license serial number provided earlier.
Click on Issues tab to go back to the Submit Inward Telcall form.
Type the required subject in the Subject field.
Type the customer’s query in the Query text box
Type the required response in the Response text box
Click Template
To get a list of standard templates that the partner can use in order to answer queries/issues from the customer
Click KB Search
The KB tab appears displaying the KB Search Page
Type the required keywords in the Look For field
Select the required product from In Product
Select the required match parameter from Match
Click Go
The list or articles containing the keywords appear, open the required article/FAQ by clicking the subject line.
In the Content Preview window click Link to Ticket to link the article to the respective issue.
The articles linked appear in the Assisted Articles sections
In the Status section
Select the appropriate status for Issue Closed? field (Yes or No)
In Problem Categorization section
Select the required Category from the available list.
Based on the category selected select the required sub-classification(s)
Select the required Priority from the available list.
The completed Submit Inward telcall form appears as shown:
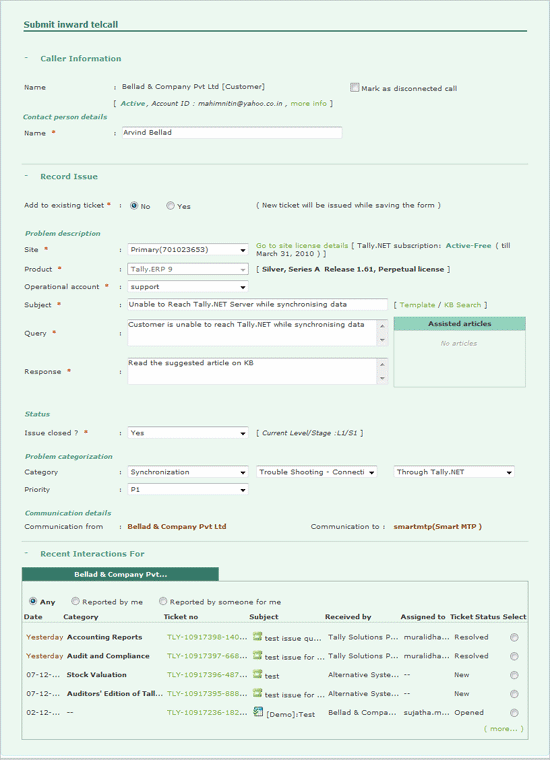
Click Save
The issue Summary tab appears
Click Save
Or
To add another issue select Support Issues in Do you want to add more, click Yes and click Proceed.
You need to reply to an issue recorded earlier that came in either by an incoming telephonic call or issue that came in orally i.e., the customer had walked into your office to sort out an issue or a query.
Click New
Select Telcall (Out)
The Identify tab appears
Information of an existing customer
Check Existing Customer
Select the required option Caller ID/Email ID/Account ID/Serial Number
Based on the option selected enter the appropriate information.
Note: The Caller ID is picked up automatically by the system at the customer support centre. TSP/TI’s need to enter the customer’s caller id manually.
Click Search
The customer details appear
Click Select
The Account Profile Management form appears as shown:
Select Support Issue from the Do you want to record drop down list
Click Proceed
The Submit outward telcall form appears as shown
The Customer Details appear in the Receiver Information section
In Record Issue section
Set Add to existing ticket to Yes to allot a new ticket number for the issue being recorded or click Yes to link this issue to an existing ticket number.
In Problem Description section
The Site, Product and Operational Account details are prefilled, click Go to Site License Details to view the Site Information Page for the license serial number provided earlier.
Click on Issues tab to go back to the Submit Inward Telcall form.
Type the required subject in the Subject field.
Type the customer’s query in the Query text box
Type the required response in the Response text box
Click Template
To get a list of standard templates that the partner can use in order to answer queries/issues from the customer
Click KB Search
The KB tab appears displaying the KB Search Page
Type the required keywords in the Look For field
Select the required product from In Product
Select the required match parameter from Match
Click Go
The list or articles containing the keywords appear, open the required article/FAQ by clicking the subject line.
In the Content Preview window click Link to Ticket to link the article to the respective issue.
The articles linked appear in the Assisted Articles sections
In the Status section
Select the appropriate status for Issue Closed
In Problem Categorization section
Select the required Category from the available list.
Based on the category selected select the required sub-classification(s)
Select the required Priority from the available list.
The completed Submit Outward telcall form appears as shown:
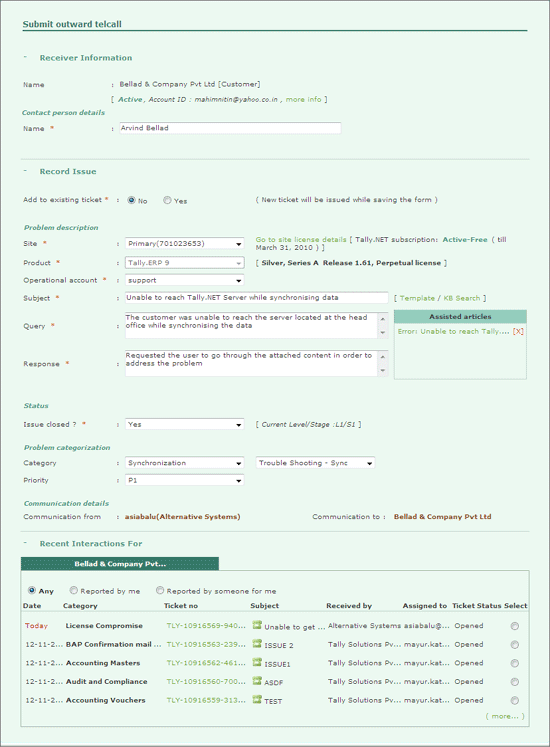
Using this option you can post a query or an issue that has come to your notice by any other means. You need to records issues/queries that did not reach you either by phone or email, the issue reached you orally. In most of the cases you meet your client at a common and the issue or a query came up for discussion, such instances can be recorded using this option.
To record a query/issue using posting follow the steps shown:
In the Support Tab
Click New
Select Posting
The Post Issue form appears as shown
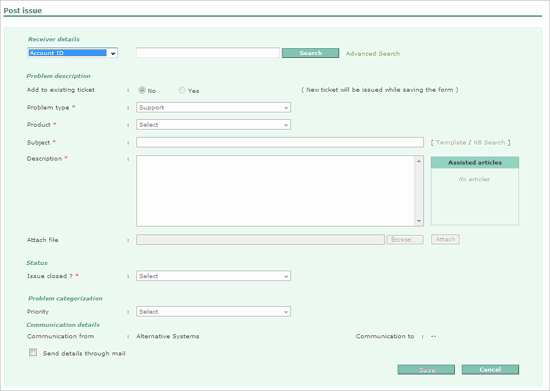
In the Receiver Details section
Select the required option Account ID/Serial Number/Ticket Number
Based on the option selected enter the appropriate information.
Click Search
The Account ID, Account Name and Status for the Serial Number provided appear
In Problem Description section
The Site, Product and Operational Account details are prefilled, click Go to Site License Details to view the Site Information Page for the license serial number provided earlier.
Click on Issues tab to go back to the Submit Inward Telcall form.
Type the required subject in the Subject field.
Type the customer’s query in the Query text box
Type the required response in the Response text box
Click Template
To get a list of standard templates that the partner can use in order to answer queries/issues from the customer
Click KB Search
The KB tab appears displaying the KB Search Page
Type the required keywords in the Look For field
Select the required product from In Product
Select the required match parameter from Match
Click Go
The list or articles containing the keywords appear, open the required article/FAQ by clicking the subject line.
In the Content Preview window click Link to Ticket to link the article to the respective issue.
The articles linked appear in the Assisted Articles sections
In the Status section
Select the appropriate status for Issue Closed? field (Yes or No)
In Problem Categorization section
Select the required Category from the available list.
Based on the category selected select the required sub-classification(s)
Select the required Priority from the available list.
The completed Post Issues form appears as shown
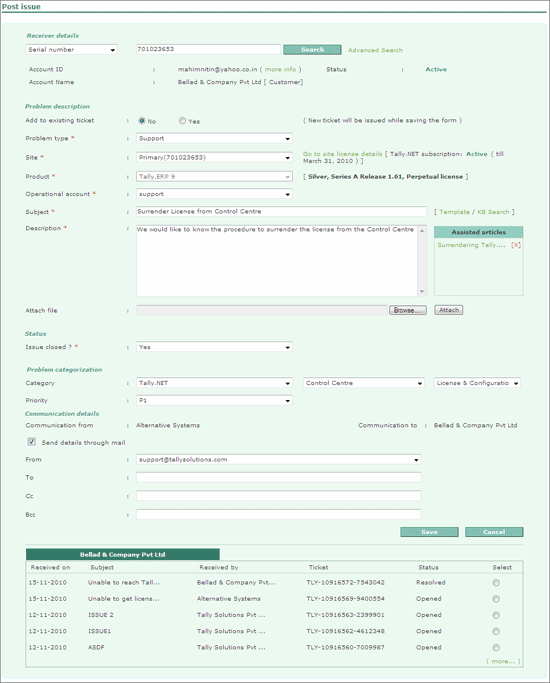
Click Save
For a detailed reading or recording an Appointment/Task/Lead click the links provided below