Issues or queries that reached you by E-Mail/Telcall/Posting and recorded earlier in the support centre can be addressed or replied by the assigned Support Executive/Manager. The replies to the issues need to be addressed using the respective media made available in the Support Centre.
To reply to the issues recorded earlier, select the respective options available
Response by Email (Out)
Response by Telcall (In)
Response by Telcall (Out)
Response by Posting
Appointment
Task
Notes
To record a response to an Issue/Query posted earlier follow the steps shown below:
Click Support tab
Select the required Issue from the list of issues displayed
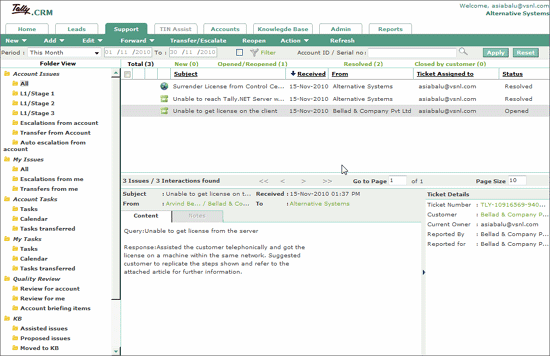
Click Add
Select Response by Email (Out)
The Add Email Response form appears as shown:
.gif)
The Reporter Details and Reported Details are pre-filled with Account ID, Status and Account Name.
Click More Info
The Account Profile Management page appears displaying the details for the serial number provided earlier. Close the Account Profile Management window and return to Add Email Response.
In the Problem Description section
Select the required Problem Type from the list displayed
The Site, Product and Operational Account details are pre-filled, you can also click on the Go to site license details to view the license site details.
The Subject is prefilled, to alter or change the subject type the required subject, if any, in the Subject field.
Type the response to the query/issue in the Description field
To add a Template/KB Article to the query, click the required option.
Click Template to get a list of standard templates, which the partner can use to answer queries/issues from the customer
Click KB Search
The KB tab appears displaying the KB Search Page
Type the required keywords in the Look For field
Select the required product from In Product
Select the required match parameter from Match
Click Go
The list or articles containing the keywords appear, open the required article/FAQ by clicking the subject line. The solution can be copied and pasted in Description or the article can be downloaded as PDF, and attached to the reply.
In the Content Preview window click Link to Ticket to link the article to the respective issue.
The articles linked appear in the Assisted Articles sections
Click Browse, select the required file and click Attach to attach a file to the existing mail.
In the Status section
Select Yes when there is adequate response provided and the issue needs to be resolved or select No when the issue needs more such interactions.
To transfer this issue to an executive or next level select any one of the following options.
Transfer to Executive – Transfers the issue to an Executive/Manager and select their name from the list displayed
Transfer to Stage – Transfers the issue to next stage, you can select the required stage from the list available.
In the Response Details section
The Category and Sub Categories select appropriate category depending on customer’s query.
The Priority field is pre-filled with the category while recording the issue. To alter the priority select the required priority from the options displayed.
The Expected Closure (External) and Expected Closure (Internal) are prefilled. To change the date select the required date and time for the respective fields.
In the Communication From section
The Communication from is prefilled and cannot be changed
The Communication to is prefilled with the company’s name. To change the recipient company’s name select the required company name from the list displayed.
By default, the From field is prefilled with the Support email address (support@tallysolutions.com)
Type the required email id or press enter to accept the default email id.
To mark a copy of this mail to multiple recipients type the email id CC/BCC fields
The completed Add Email Response form appears as shown:
.gif)
Click Save
The Support tab appears displaying the reply to an issue. Click + to view the response to the query/issue

Use this option when customer calls for issue that was reported earlier or with an earlier ticket number.
To respond to Telcall (in) follow the steps given:
In the Support tab
Click Add
Select Response by Telcall (In)
The Submit Inward telcall form appears as shown:
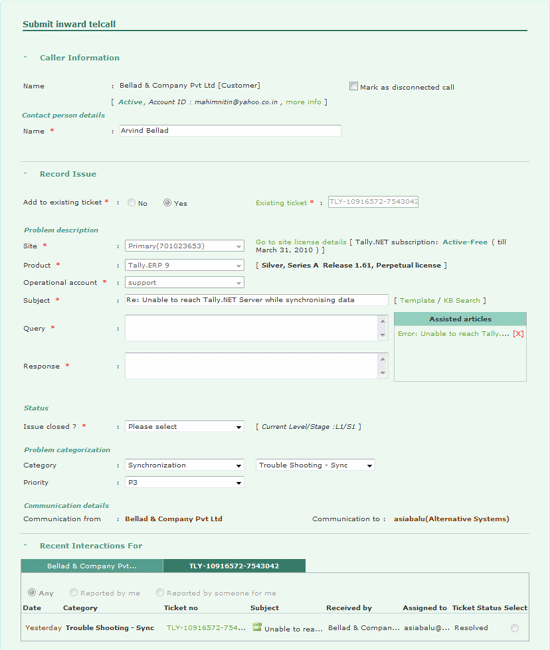
In the Caller Information section
The Company Name, Account Id and Status are displayed, click More Info to display the Account Profile Management page.
In the Contact Person Details
The contact person’s name is displayed in the Name field, to change or alter the contact person’s name. Type the required name in the Name field.
In Record Issue
Add to an existing issue is set to Yes and the Existing Ticket number displayed as we had selected the issue in the Support tab.
In the Problem Description section
The fields Site, Product and Operational Account are pre-filled. Validity of the Tally.NET Subscription is also displayed.
Click Go to Site License Details to view information on the Site Licenses.
The Subject field is pre-filled with subject provided earlier, to change or alter the subject, enter the required line of text in this field.
Type the required issue/query in the Query field
Enter the response to the query in the Response field
To support the response with a Template or an article from the Knowledge Base, click the respective link and follow the steps shown:
Click Template
To get a list of standard templates that the partner can use in order to answer queries/issues from the customer
Click KB Search
The KB tab appears displaying the KB Search Page
Type the required keywords in the Look For field
Select the required product from In Product
Select the required match parameter from Match
Click Go
The list or articles containing the keywords appear, open the required article/FAQ by clicking the subject line. The solution can also be pasted to the description or the article can be downloaded as PDF and attached to the reply.
In the Content Preview window click Link to Ticket to link the article to the respective issue.
The articles linked appear in the Assisted Articles sections
In the Status section
Select Yes when there is adequate response provided and the issue needs to be closed or select No when the issue needs more such interactions or issues needs time to work and then provide solution later.
To transfer this issue to an executive or next level select the respective options available.
Transfer to Executive – Transfers the issue to an Executive/Manager and select their name from the list displayed
Transfer to Stage – Transfers the issue to next stage, you can select the required stage from the list available.
In the Response Details section
The Category and Sub Categories are prefilled. To change the categories select the required options from the list of Categories and Sub Categories displayed.
The Priority field is pre-filled with the category. To alter the priority select the required priority from the options displayed.
The Expected Closure (External) and Expected Closure (Internal) are prefilled. To change the date select the required date and time for the respective fields.
In the Communication From section
The Communication from is prefilled and cannot be changed
The Communication to is prefilled with the company’s name. To change the recipient company’s name select the required company name from the list displayed.
The completed Add Inward Telcall form appears as shown:
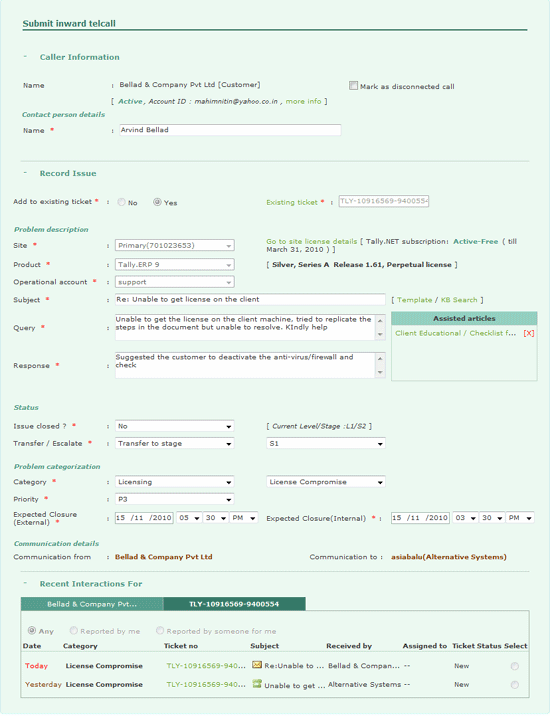
Click Save
The response to the telcall is added as shown

To respond to an outgoing telephonic call follow the steps shown:
In the Support tab
Click Add
Select Response by Telcall (Out)
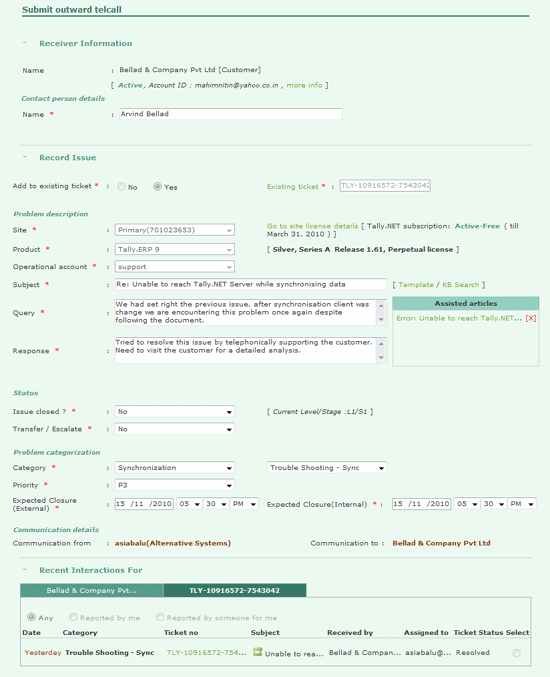
The Submit outward telcall form appears as shown
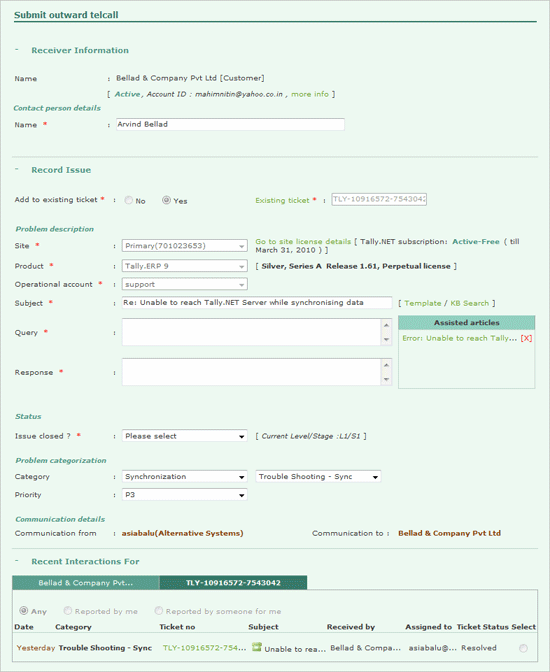
In the Receiver Information section
The Company Name, Account Id and Status are displayed, click More Info to display the Account Profile Management page.
In the Contact Person Details
The contact person’s name is displayed in the Name field, to change or alter the contact person’s name. Type the required name in the Name field.
In Record Issue
Add to an existing issue is set to Yes and the Existing Ticket number displayed as we had selected the issue in the Support tab.
In the Problem Description section
The fields Site, Product and Operational Account are pre-filled. Validity of the Tally.NET Subscription is also displayed.
Click Go to Site License Details to view information on the Site Licenses.
The Subject field is pre-filled with subject provided earlier, to change or alter the subject, enter the required line of text in this field.
Type the required issue/query in the Query field
Enter the response to the query in the Response field
To support the response with a Template or an article from the Knowledge Base, click the respective link and follow the steps shown:
Click Template
To get a list of standard templates that the partner can use in order to answer queries/issues from the customer
Click KB Search
The KB tab appears displaying the KB Search Page
Type the required keywords in the Look For field
Select the required product from In Product
Select the required match parameter from Match
Click Go
The list or articles containing the keywords appear, open the required article/FAQ by clicking the subject line. The solution can be pasted in description or the article can be downloaded as PDF and attached to the reply.
In the Content Preview window click Link to Ticket to link the article to the respective issue.
The articles linked appear in the Assisted Articles sections
In the Status section
Select Yes when there is adequate response provided and the issue needs to be closed or select No when the issue needs more such interactions.
To transfer this issue to an executive or next level select the respective options available.
Transfer to Executive – Transfers the issue to an Executive/Manager and select their name from the list displayed
Transfer to Stage – Transfers the issue to next stage, you can select the required stage from the list available.
In the Response Details section
The Category and Sub Categories are prefilled. To change the categories select the required options from the list of Categories and Sub Categories displayed.
The Priority field is pre-filled with the Category while recording the issue. To alter the priority select the required priority from the options displayed
The Expected Closure (External) and Expected Closure (Internal) are prefilled. To change the date select the required date and time for the respective fields.
In the Communication From section
The Communication from is prefilled and cannot be changed
The Communication to is prefilled with the company’s name. To change the recipient company’s name select the required company name from the list displayed.
The completed Submit Outward telcall form appears as shown:
Click Save
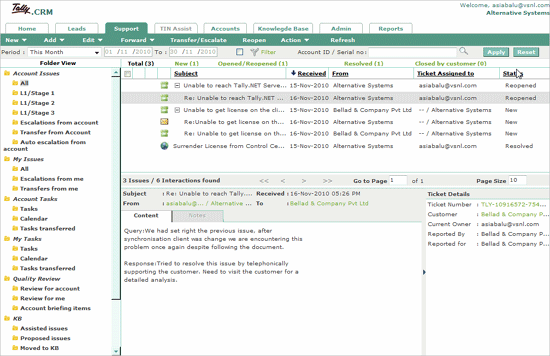
The outward response for telcall appears as shown:
This option should be used while responding to a direct issue (issue raised from Support Centre in the product).
To respond to direct issues,
Select the required issue in Support
Click Add Response
Select Posting
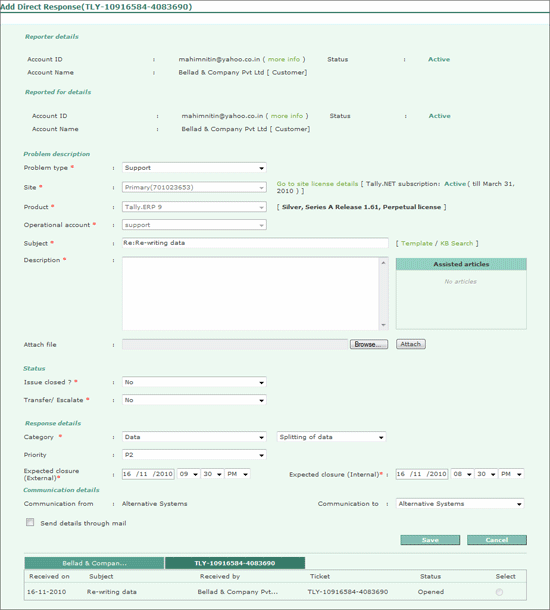
The Add Direct Response form appears as shown
In the Receiver Information section
The Company Name, Account Id and Status are displayed, click More Info to display the Account Profile Management page.
In the Contact Person Details
The contact person’s name is displayed in the Name field, to change or alter the contact person’s name. Type the required name in the Name field.
In Record Issue
Add to an existing issue is set to Yes and the Existing Ticket number displayed as we had selected the issue in the Support tab.
In the Problem Description section
The fields Site, Product and Operational Account are pre-filled. Validity of the Tally.NET Subscription is also displayed.
Click Go to Site License Details to view information on the Site Licenses.
The Subject field is pre-filled with subject provided earlier, to change or alter the subject, enter the required line of text in this field.
Type the required issue/query in the Query field
Enter the response to the query in the Response field
To support the response with a Template or an article from the Knowledge Base, click the respective link and follow the steps shown:
Click Template
To get a list of standard templates that the partner can use in order to answer queries/issues from the customer
Click KB Search
The KB tab appears displaying the KB Search Page
Type the required keywords in the Look For field
Select the required product from In Product
Select the required match parameter from Match
Click Go
The list or articles containing the keywords appear, open the required article/FAQ by clicking the subject line. The solution can be pasted in description or the article can be downloaded as PDF and attached to the reply.
In the Content Preview window click Link to Ticket to link the article to the respective issue.
The articles linked appear in the Assisted Articles sections
In the Status section
Select Yes when there is adequate response provided and the issue needs to be closed or select No when the issue needs more such interactions.
To transfer this issue to an executive or next level select the respective options available.
Transfer to Executive – Transfers the issue to an Executive/Manager and select their name from the list displayed
Transfer to Stage – Transfers the issue to next stage, you can select the required stage from the list available.
In the Response Details section
The Category and Sub Categories are prefilled. To change the categories select the required options from the list of Categories and Sub Categories displayed.
The Priority field is pre-filled with the Category while recording the issue. To alter the priority select the required priority from the options displayed
The Expected Closure (External) and Expected Closure (Internal) are prefilled. To change the date select the required date and time for the respective fields.
In the Communication From section
The Communication from is prefilled and cannot be changed
The Communication to is prefilled with the company’s name. To change the recipient company’s name select the required company name from the list displayed.
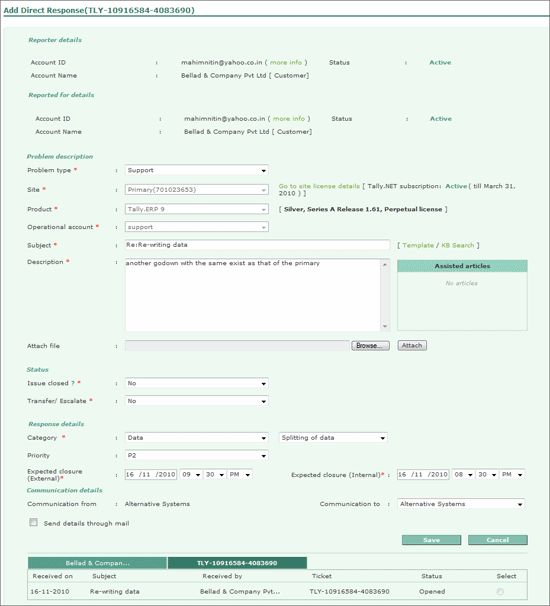
The completed Add Direct Response form appears as shown
Click Save
The response appears in the Support tab as shown:
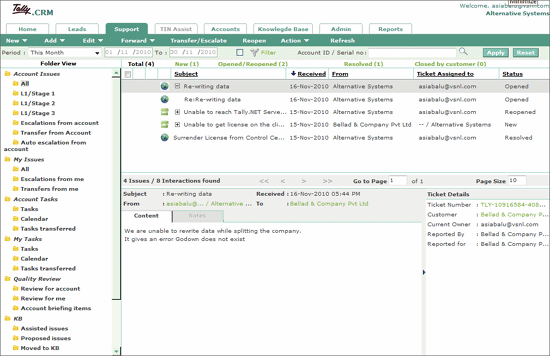
Notes are an integral part of any issue/query. Notes provided by you are internal to the organisation and can be accessed by the authorised person only. All notes related to an issue/query are tagged to the respective issue for reference at later stage.
To add notes to an issue/query follow the steps shown:
In the Support tab
Select the required issue
Click Add
Select Notes
The Add Note window appears as shown:
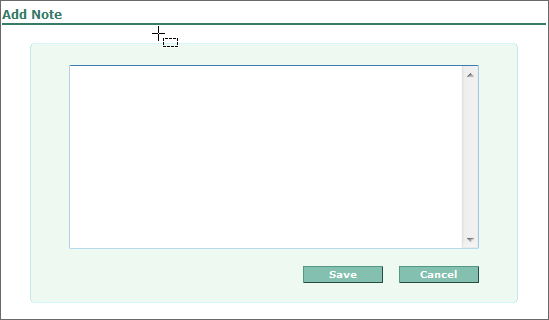
Type the required notes in the box provided
Click Save
Click Notes
The notes added for a respective issue will appear as shown:
