You can schedule appointments by following the steps given:
In My Appointments
Click the required date of the respective month
Click the required time in the Appointments for column
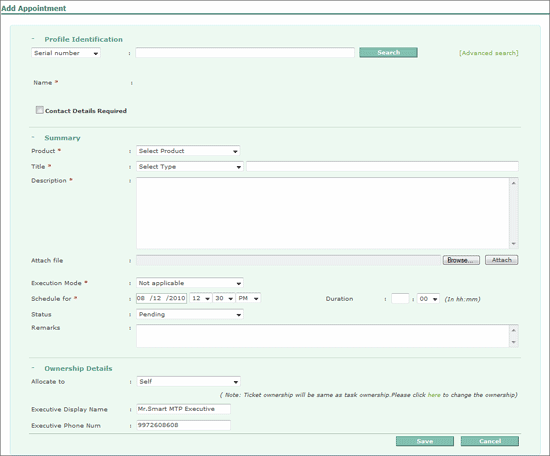
The Add Appointment form appears as shown:

In the Profile Identification section:
Select Account ID / Email ID / Serial Number from the drop down
Enter the required Account ID or Email ID or Serial Number in the field provided
Press Enter or click Search.
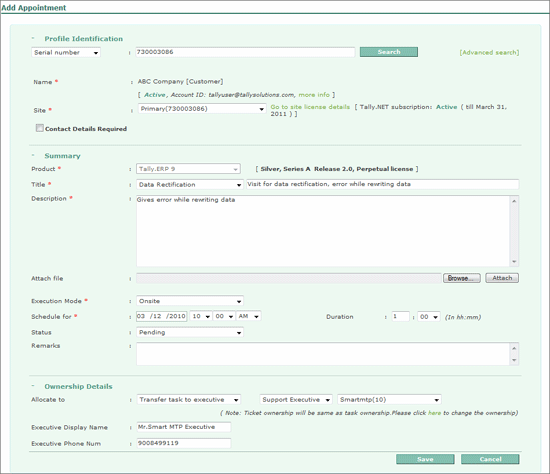
The Company/Customer Name and Site details appear in the Name and Site fields respectively.
Check Contact Details Required to display the Contact Name, Designation, Address, Mobile/Phone Number details of the respective customer, in case these details were provided earlier.
In the Summary section:
The Product field populates and displays the product based on the Serial Number, Account ID and Email ID provided.
Select the required type of support that needs to be rendered from the Title list box.
Enter the description to the title or details on the error/problem encountered by the client.
In case you have any files that need to be attached, click Browse, navigate to the required folder and select the file and click open.
Click Attach to attach the selected file.
Select the required Execution Mode from the drop down list box
On Site – Provide on-site support to the client
Remote – Provide support to the client from a remote location
In Schedule for click the date picker and select the required date to schedule an appointment
Select the Hours and Minutes from the respective list boxes displayed
Select AM/PM from the list box displayed
Enter the duration as required in hours or minutes
By default the status is set to Pending
Enter the remarks, if any, in the remarks text box
In the Ownership Details section:
By default, the Allocate to is set to Self, to transfer the appointment to a Support Executive or a Tally Service Partner select the respective options available.
Transfer to Executives: On selecting this option, two more drop down boxes appear. From the first drop down list select Support Executive or Support Manager and select the name of the respective support executive/manager.
Transfer to Service Partner: On selecting this option, mention the Account ID/Account Name/Email ID of the partner in the Transfer to field provided.
The Name and Phone number of the selected executive are displayed in the Executive Display Name and Executive Phone Number fields respectively.
Note: The Contact Name and Mobile number will get automatically displayed in case the same has been updated in My Profile available at the Login page.
The completed Add Appointment form appears as shown:

Click Save to submit the form.
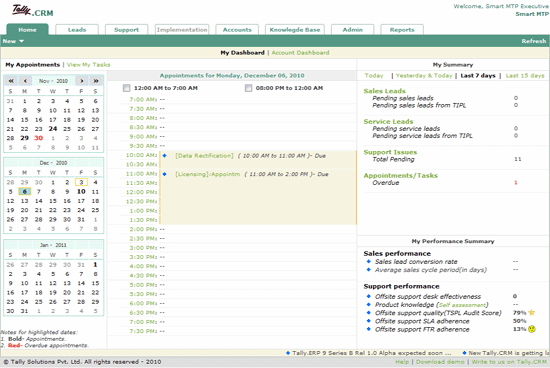
The Appointment under My Calendar displays the appointment fixed for the selected date and time as shown:

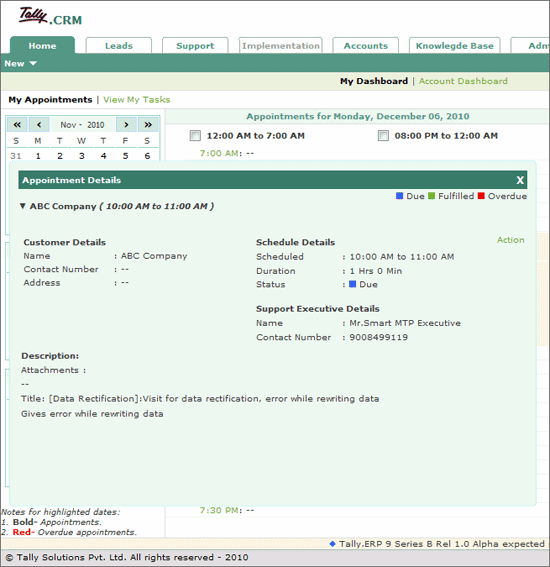
To view details of an appointment, click on the appointment title.
The Appointment Details screen appears as shown:

Note: The appointment list may also be viewed from Support.