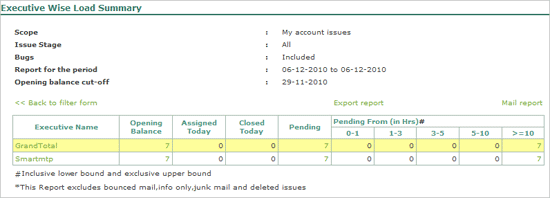
The customer support reports essentially give you a summary of statistics on the following:
Repeat Call summary gives you the total number of repeated calls for a defined period
Ticket Summary
Interaction Summary displays the count of interactions that took place between the support executive and the customer.
Executive Task Summary displays the summary of tasks handled by an executive
To view the repeat call summary follow the steps shown:
In the Report tab
Click Customer Support
Select Repeat Call Summary
The Repeat Call Tracking Report appears as shown
![]()
Click on the down arrow and select the Report Period from the drop down list. Based on the report period selected the starting and ending dates appear.
Set the Opening balance cut-off date by clicking within the date field and selecting the date from the date picker displayed.
Click on the down arrow and select the required Scope
Select the required level of support S1/S2/S3
Select the required mode of reporting an issue
All displays issues reporting using all the available modes
Email displays all issues reported by Email
TelCall displays all issues reported by TelCall
Direct displays all issues that were reported not using any one of the above mode.
Click on the down arrow and select the required Product.
Note: At any point, if you want to change the product click X to delete the product and select the product once again from the drop down list.
Click on the down arrow and select the required Operational Account
Note: At any point, if you want to change the product click X to delete the product and select the product once again from the drop down list.
Click on the down arrow and select the required Category. Based on the category selected the report is displayed based on the executive or the customer.
Click Show Report
The Repeat Call Tracking Report appears as shown
![]()
Click the required Executive
A list appears displaying the categories as shown
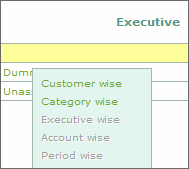
Select the required category
The Repeat Call Tracking Report appears as shown
![]()
You can further drill down the report by clicking on the values displayed in Total Calls and Total Tickets.
To view the Ticket Summary Report, follow the steps shown:
In the Report tab
Click Customer Support
Select Ticket Summary
The Ticket Summary Report appears as shown
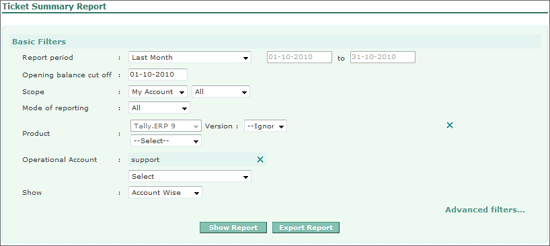
Click on the down arrow and select the Report Period from the drop down list. Based on the report period selected the starting and ending dates appear.
Set the Opening balance cut-off date by clicking within the date field and selecting the date from the date picker displayed.
Click on the down arrow and select the required Scope
Select the required level of support S1/S2/S3
Select the required mode of reporting an issue
All displays issues reporting using all the available modes
Email displays all issues reported by Email
TelCall displays all issues reported by TelCall
Direct displays all issues that were reported not using any one of the above mode.
Click on the down arrow and select the required Product.
Note: At any point, if you want to change the product click X to delete the product and select the product once again from the drop down list.
Click on the down arrow and select the required Operational Account
Note: At any point, if you want to change the product click X to delete the product and select the product once again from the drop down list.
Click on the down arrow and select the required Category. Based on the category selected the report is displayed based on the executive or the customer.
Click Show Report
In order to apply additional filters and narrow down the search
Click Advanced Search
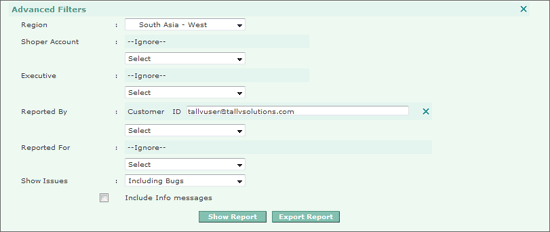
The Advanced Filters portion appears as shown:
In the Advanced Filters section
Select the required Region from the drop down list.
Select the required Shoper Account from the drop down list, if required. For queries arising from Tally/Tally.ERP 9 this parameter can be ignored.
Select the name of the Executive from the drop down list.
Select Customer/Partner/Prospect/Unknown in Reported By, provide the Partner/Customer/ Prospect’s email address in the respective field.
Select Customer/Partner in Reported For, provide the Partner/Customer’s email address in the respective field.
In Show Issues select Including Bugs/Excluding Bugs/Only Bugs
Check Include Info Messages to display information messages along with the issues
Click Show Report
The Pending Issue Aging Report appears as shown
.gif)
Click Show Report
The Ticket Summary Report appears as shown:
By default the blue coloured up arrow key appears in the Account column of this report. You can change the sorting order by clicking in the selected column once again.
Up Arrow indicates the column sorted in the ascending order
Down Arrow indicates the column is sorted in descending order
To know further details for the partner listed in this report
• Click the values displayed in the respective column.
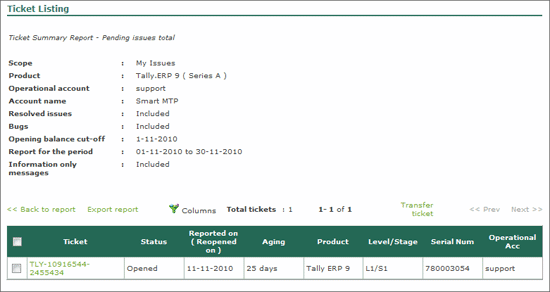
The Ticket Listing for the selected column appears as shown:
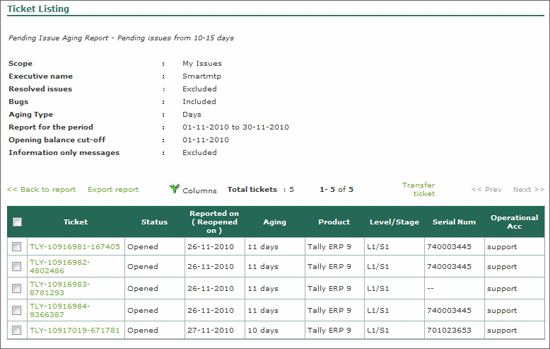
Export Report – exports the report to an excel file.
Column – Allows the user to add or remove columns from the Ticket Listing report.
Transfer Ticket – allows the user to transfer the selected ticket to any one of the following:
Executive -
Stage
Service Partner
TIPL
To know the details for each issue
Click the respective ticket
The details for the selected report appear as shown:
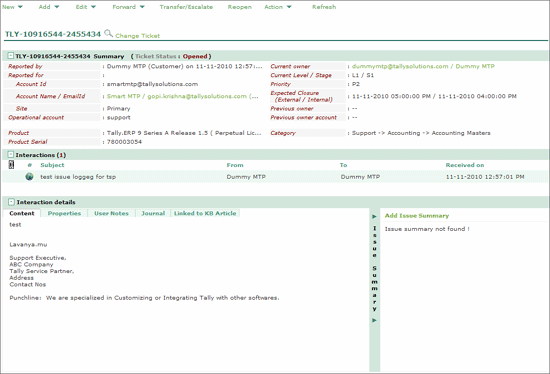
This report gives you the complete information on the interactions that happened between the customer and partner using different mediums of interactions.
For a detailed view on the summary of interactions follow the steps shown:
In the Reports tab
Click Customer Support
Select Interaction Summary
The Interaction Summary Report screen report appears as shown:
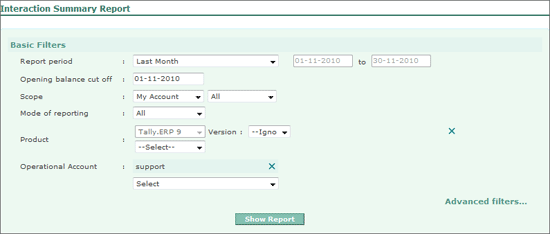
Click on the down arrow and select the Report Period from the drop down list. Based on the report period selected the starting and ending dates appear.
Set the Opening balance cut-off date by clicking within the date field and selecting the date from the date picker displayed.
Click on the down arrow and select the required Scope
Select the required level of support S1/S2/S3
Select the required mode of reporting an issue
All displays issues reporting using all the available modes
Email displays all issues reported by Email
TelCall displays all issues reported by TelCall
Direct displays all issues that were reported not using any one of the above mode.
Click on the down arrow and select the required Product.
Note: At any point, if you want to change the product click X to delete the product and select the product once again from the drop down list.
Click on the down arrow and select the required Operational Account
Note: At any point, if you want to change the product click X to delete the product and select the product once again from the drop down list.
Click on the down arrow and select the required Category. Based on the category selected the report is displayed based on the executive or the customer.
Click Show Report
In order to apply additional filters and narrow down the search
Click Advanced Search
The Advanced Filters section appears
Select the required Region from the drop down list.
Select the required Shoper Account from the drop down list, if required. For queries arising from Tally/Tally.ERP 9 this parameter can be ignored.
Select the name of the Executive from the drop down list.
Select Customer/Partner/Prospect/Unknown in Reported By, provide the Partner/Customer/ Prospect’s email address in the respective field.
Select Customer/Partner in Reported For, provide the Partner/Customer’s email address in the respective field.
In Show Issues select Including Bugs/Excluding Bugs/Only Bugs
Check Include Info Messages to display information messages along with the issues
Click Show Report
The Interaction Summary Report appears as shown
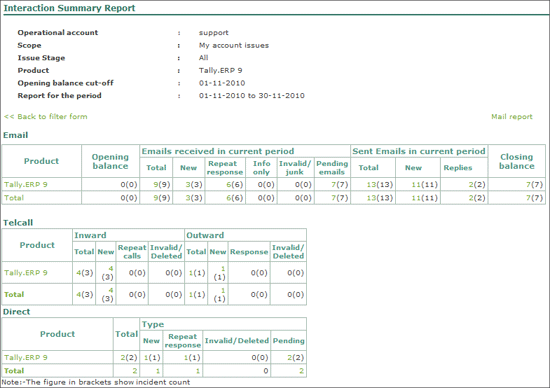
To know the summary of interactions under any medium Email/Telcall/Direct
Click product displayed in the Product column and select from any one of the following
Product Wise displays the summary of interactions for the selected product. This appears by default.
Category Wise displays the list of interactions for Sales and Support category of the respective product.

Executive Wise displays the summary of interactions for each executive.

Account Wise – displays the summary of interactions for each account.
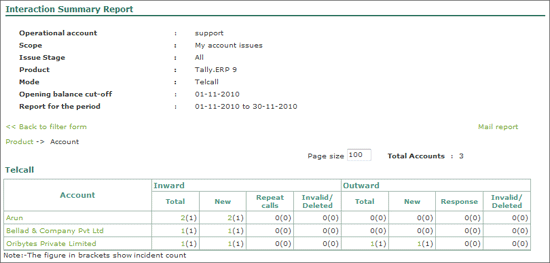
To know further details about each interaction click the respective item under each column.
Mail Report – Allows you email the required report. You can provide the email address in the To field and click Send.
This report gives you the complete information on the interactions that happened between the customer and partner using different mediums of interactions.
For a detailed view on the summary of interactions follow the steps shown:
In the Reports tab
Click Customer Support
Select Executive Task Summary
The Executive Task Summary screen appears as shown:
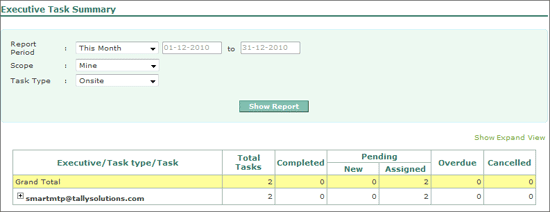
By default the Executive Task Summary is displayed for This Month, to change the Report Period, Scope and Task Type follow the steps shown:
Click on the down arrow and select the required Report Period from the drop down list. Based on the report period selected the starting and ending dates are pre-filled.
Click on the down arrow and select the required Scope
Select the required task type.
Click Show Report
For a detailed view of the report
Click Show Expand View or +
The Executive Wise Load Summary appears as shown
