This report gives you the ageing analysis for pending leads in partner account. The details of Received, Won/Fulfilled, Lost/Dropped leads for Sales and Services are displayed along with age-wise (number of days) breakup of pending leads.
It also allows you to view lead age based on days, hours and business hours for a specified duration.
To view Leads Ageing Report,
In the Reports tab,
Click Leads
Click Leads Ageing Report
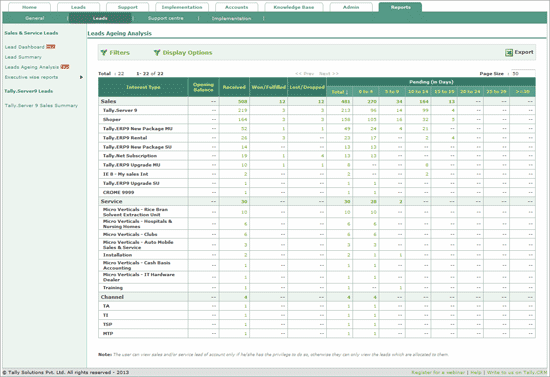
The Leads Ageing Report screen is displayed as shown:

Column heads in this report
Interest Type: The product or service in which the prospect is interested.
Opening Balance: Opening balance count of leads at beginning of the report period.
Received: Total number of leads received.
Won/Fulfiled: The number of leads that were successfully converted to sales.
Lost/Dropped: The number of leads that were closed or dropped.
Pending (in Days): Day-wise break up of issues pending
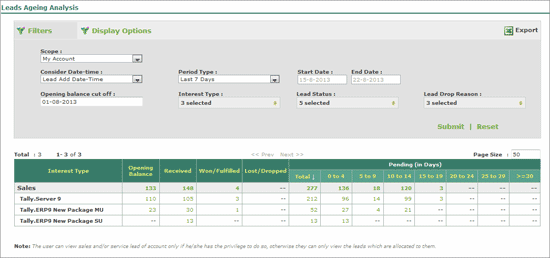
Filters
Various filters are provided to configure the report to display information as per your requirement.
Scope: Select My Account or Mine to display leads allocated to your organisation or to any other partner
Consider Date-time: Select Lead Add Date-Time or Lead Allocation Date-Time to age the leads based on lead added time or the time at which lead was allocated to the partner/executive in the field.
Period Type: By default, ageing analysis is shown using 5 day break up. You can configure the ageing breakup as per your need using this filter. The options available are Yesterday, Last 7 Days, Last 15 Days, This Month, Last Month, Last 3 Months, Last 6 Months, Mention period.
Start Date and End Date: In case Mention Period is selected as the Period Type, you can enter the time frame using the date fillers.
Opening balance cut-off date: Set the opening balance cut-off date from the date picker. The pending leads as on the selected data will be displayed as opening balance in the report.
Interest Type: Select the products under sales and services to be displayed in the report. Click Check All to select all the products and Uncheck All to unselect any selection.
Lead Status: Select status types for the lead to be displayed in the report in the Lead Status field. By default New, Won/Fulfilled and Lost/Dropped are displayed. Other status options available are Follow up, Ready to Buy, Contact Later and Demo Completed.
Lead Drop Reason: Select the different reasons for dropping leads in this field. This field is active only when Lost/Dropped status type is selected in the Lead Status field.
Submit: Click Submit to apply the filters to the report.

Reset: Click Reset to clear the applied filters and provide new filters
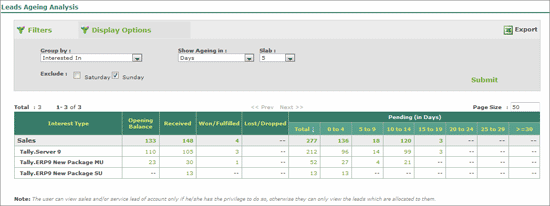
Display Options
Group By: Select Site or Executive wise or Interested In or My TPs to display the details based on selected option.
Show Ageing: Select the required option to view the ageing analysis report in terms of Days or Hours or Business Hours.
Slab: Select the required option to display the ageing analysis report in terms of the selected slab. For example: If Days is selected in the Show Ageing in field and 10 is selected in the Slab field, then this report will display the information with the ageing 0-9. 10-19, 20-29 and so on.
Exclude: Select the Saturday and/or Sunday check box in Exclude field to exclude these days while determining the ageing.
Submit: Click Submit to apply the filters to the report.

Page size
The number of line items in a single page of the report can be altered using this option. The maximum page size that can be stated is 100.
Sort
Click the column head of age break columns to sort the details in ascending or descending order.
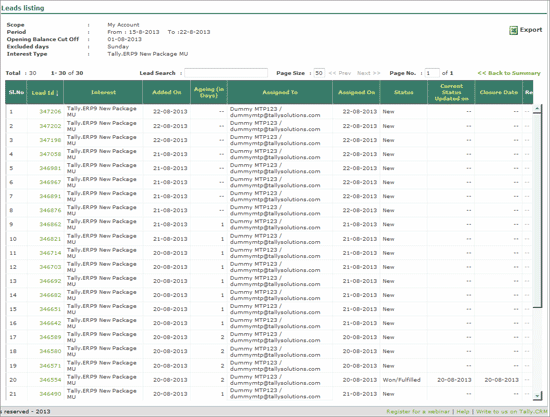
From the Leads Ageing Report, click any value to display the Lead Listing report. The Lead Listing report displays complete details of the leads for the selected value.

The leads listing screen provides the following details:
Lead Id: The ID of the each lead
Interest: The interest type for each lead, from products, service and channel.
Added On: The date on which each lead was added.
Assigned to: The account ID to which this lead is assigned to. In case the lead is assigned to your partner, the his Account ID is displayed. If it is assigned to your account, then your registered Account ID is displayed in this column.
Assigned On: The date on which lead was assigned.
Status: Lead status is displayed in the column. Based on the activities undertaken to pursue the lead, the status will change from New to Follow up and there on.
Current Status Updated on: The date on which the last status was updated for the lead.
Closure Date: The date of closing the lead.
Lead Search
This option can be used to search for a lead using the lead ID, assigned to, Mobile no., City, etc. For Example: Enter the lead ID in this field and press Enter to search.
Sort
You can sort the information in the Lead Listing screen by clicking the column heads. Clicking a column head will arrange the details in ascending or descending order.
For example: Click the column head Lead ID to sort leads from the smallest Lead ID to the highest or vice versa.
Export
Use to export the displayed details in excel format.
Back to Summary
Click to return to the Lead Dashboard screen.